Pixel for Odoo Community
Pixel is a user-friendly application that enables businesses to customize their ERP system without requiring extensive programming knowledge. It provides a drag-and-drop interface, allowing users to create and modify fields and views, adjust workflows, and tailor functionalities to suit their specific business needs. With Pixel, users can add custom fields, edit field properties, and hide fields from views, streamlining data management and automation without the need for complex coding. Additionally, it provides control over view access permissions, allowing users to modify create, edit, delete, and duplicate settings for records, ensuring precise control over data accessibility. By offering flexibility and ease of customization, Pixel empowers users to personalise their ERP experience efficiently and effectively.
Video Tutorial
Highlight

No coding required
Custom Field Creation
Dashboard Builder
Modify Odoo Fields
Hide Fields from View
Manage View Access Permissions
Form and List View Editor
See Customized Field Properties
Menu Editor
 Features
 Screenshots
 Support
 Service
Features
Custom Field Creation :
Easily add new fields to any form or view with just a few clicks no coding required. Choose from a wide range of field types, configure properties instantly, and see changes reflected in real time.
Dashboard Builder :
Create custom dashboards for any model. Add charts (bar, pie, line, etc.) with dynamic data sources. Drag-and-drop charts in the dashboard template. Edit dashboard charts.
Edit Field Properties :
Modify attributes of both custom and native Odoo fields adjust labels, visibility, and more all without writing a single line of code. Easily customize field behavior and appearance.
Access Control :
Manage permissions for creating, editing, deleting, and duplicating records.
Show Edited Field Properties :
Instantly view all modified attributes of custom and standard odoo fields for better data tracking.
Show Modified View Properties :
Access customized view configurations and effortlessly refine UI settings.
Add New Model :
Create new models. Auto-generate views (form, list) for the new model. User can link new models to existing ones via many2one, one2many, or many2many fields.
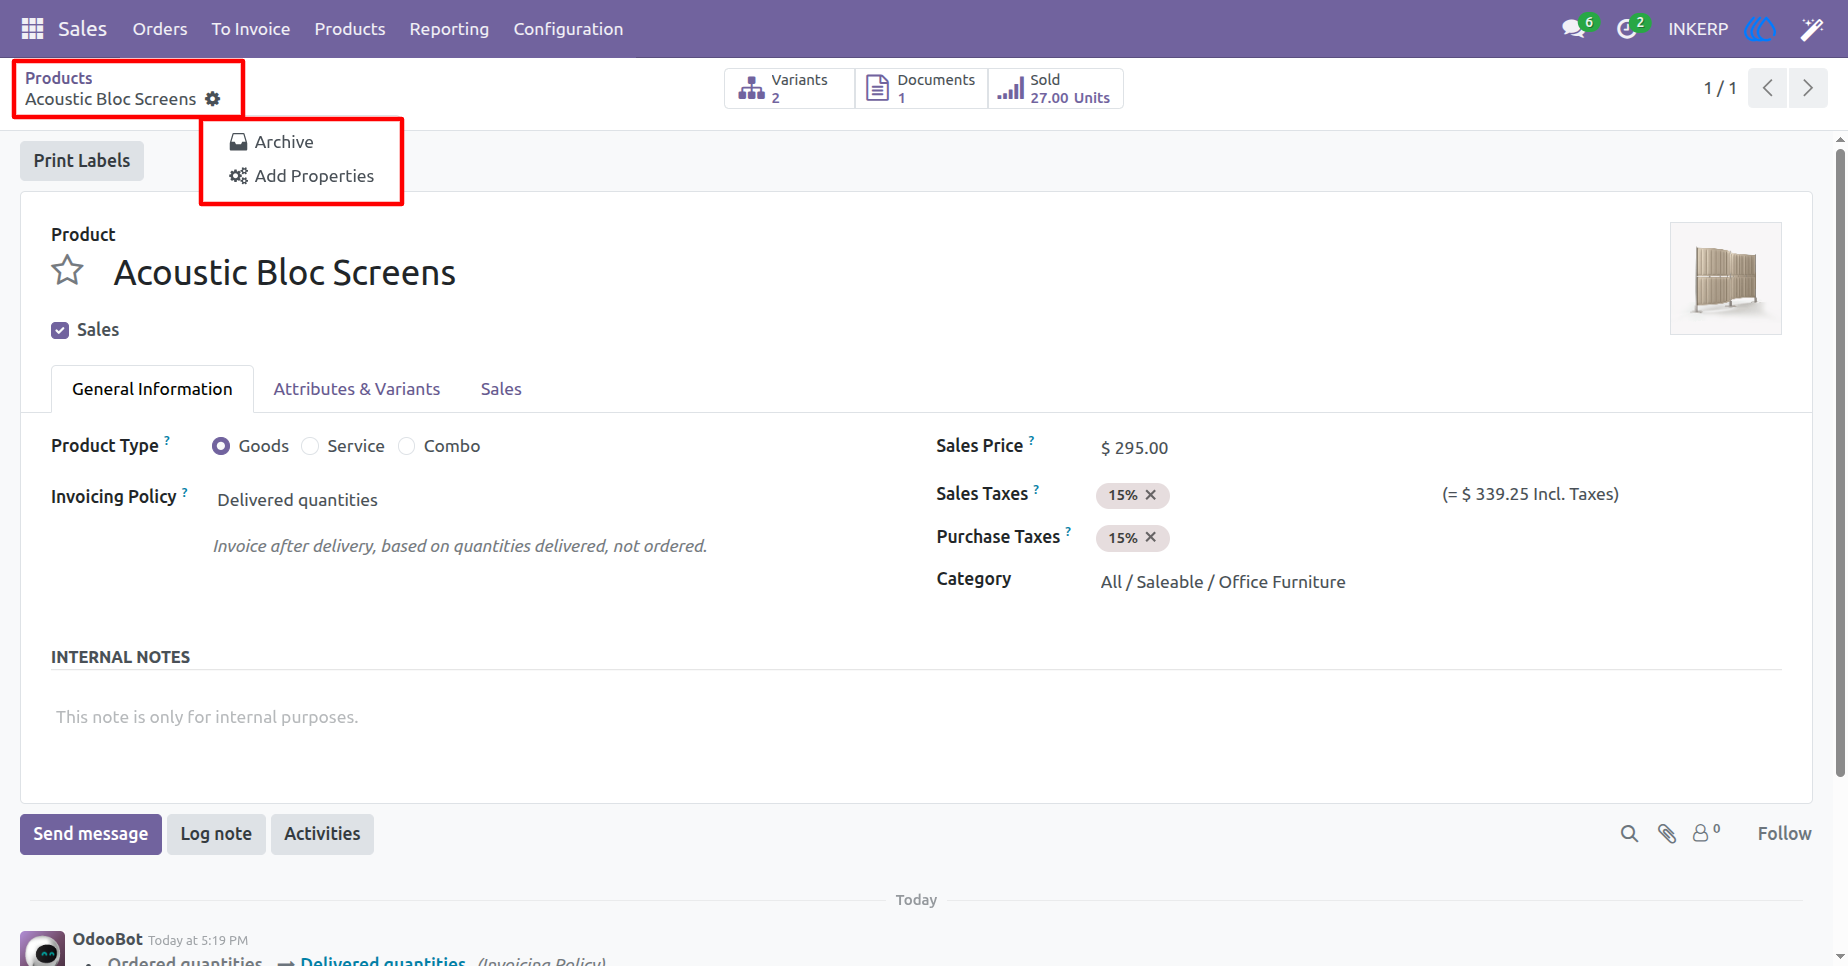
Hide Fields from View :
Remove unnecessary fields to create a cleaner user interface and more focus on what matters most.
Menu Editor :
Design your own navigation experience by adding new menu entries, editing labels and icons, adjusting access rights, and reordering items across apps or modules all from an intuitive interface without writing a single line of code.
Explore Fields in View :
View all fields of a model, including inherited and custom fields. See technical details like field name and label. Toggle visibility of fields in views (form, list).
Advanced Form Structuring :
Insert new columns into form views using drag-and-drop. Group fields into logical sections.Add custom buttons to form view. Open a wizard, trigger server actions, or call python methods.Create new pages within existing module form views.Control access rights and visibility per page.
Screenshot
1. Settings View
Unlock the developer mode to get access to technical details. In the users menu, give the pixel group access to the user.
NOTE :User must have administrator /setting access rights and developer mode on to access pixel.
Navigation : Settings → Users & Companies → Users

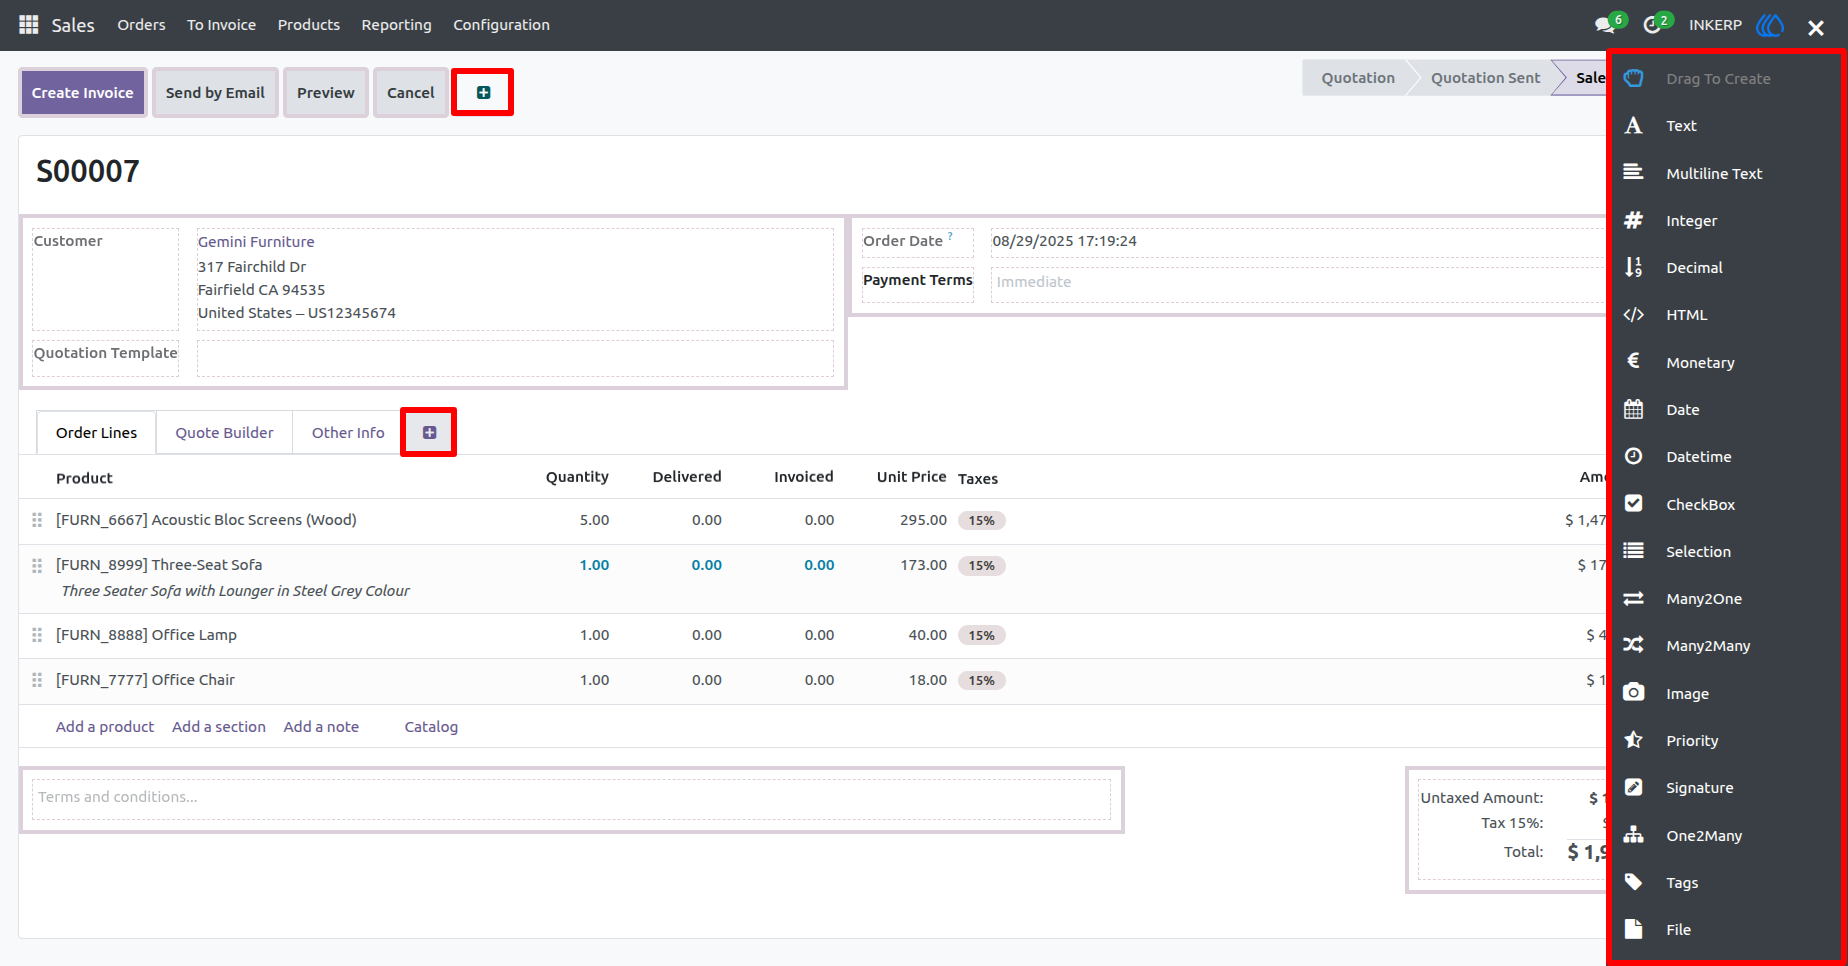
2. Pixel View
Pixel represents the field customization toolbox. It's located on the right side of the screen and provides various field types that the user can add to the form and tree view, enabling dynamic customization.
This toolbox includes buttons for different field types, such as:
Text & Multi-line Text : Basic input fields for user entries.
Integer & Decimal : Numeric fields for structured data.
HTML & Monetary : For rich text formatting and currency values.
Date & Datetime : Useful for scheduling and timestamps
Checkbox & Selection : Boolean and dropdown-based options.
Many2One & Many2Many : Relational fields to connect models.
Image, Priority & Signature : Visual and approval-based functionalities.
One2Many, Tags & File :- Multi-entry lists, classification, and document attachments.
Users can also add buttons and pages to the form view for enhanced interactivity and navigation.
3. Form View
In Pixel, users can drag and drop field buttons to create new fields in any model, not just Sales Orders. This functionality applies to Customer records, Invoices, Purchase, Inventory, HR modules, and more.
Key Aspects of Field Customization in Any Model :
Drag-and-Drop Simplicity :Users select a field type (Text, Date, Selection, etc.) from the right-hand panel and drag it into the desired models form or tree view.
No-Code Customization :Users can tailor their ERP system without coding, ensuring data accuracy, improved user experience, and model-specific workflows.
Field Properties & Behaviours :Once a field is dropped, users can define its attributes, including read-only, indexed, copied,help and groups.
This capability makes Pixel powerful for businesses of all types, allowing administrators to design the perfect data structure across different models.
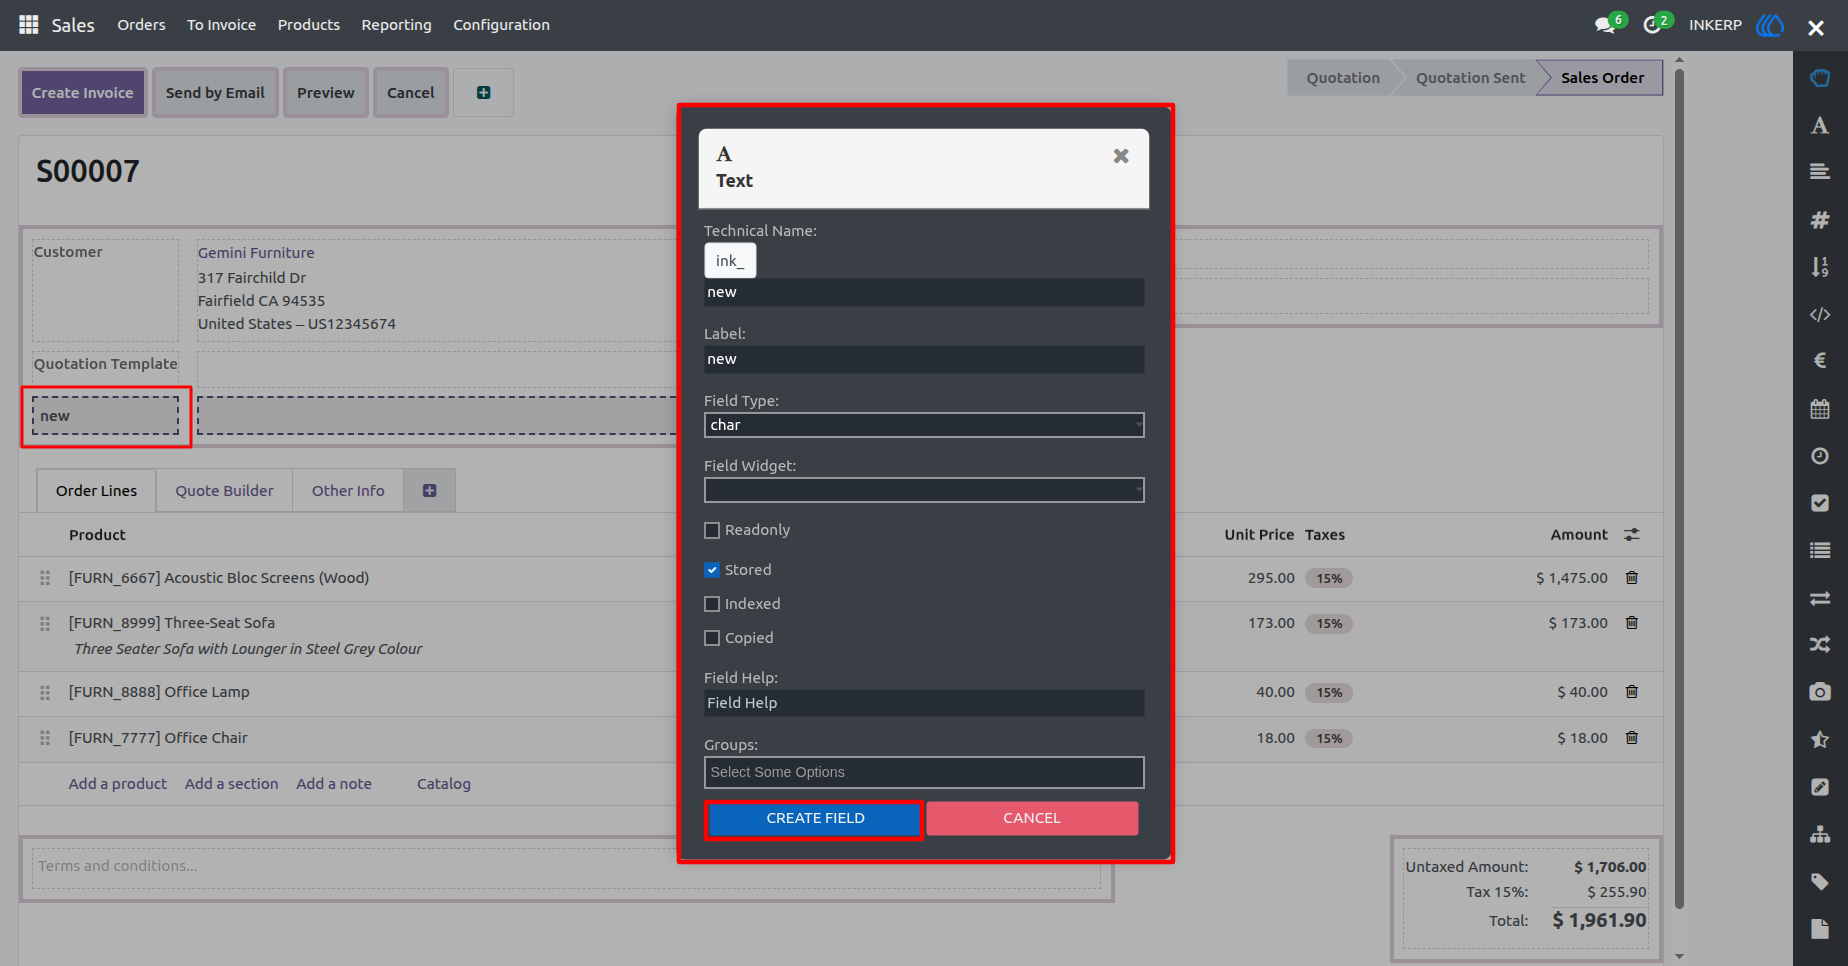
4. Field Property View
The image shows Pixel Field Property Popup, highlights the process of adding a new field to a model through the drag-and-drop functionality.
When a user drags and drops a field button from the right-hand panel, the properties panel immediately updates to show the related field's attributes.
This panel displays :
Field Label & Technical Name : Identifies the field in the database.
Field Type : Defines the data format (e.g., Char, Integer, Selection).
Position Field : Determines where a newly added field will be placed within a form or tree view.
Placement Options : Determines where the field appears in the form (e.g., Before/After another field).
Storage & Behaviour Settings : Controls whether the field is stored, indexed, read-only, or copied.
■ Clicking the "Create Field" button finalises the field addition, making it part of the selected view.
■The field is now visible in the form, ready for user input and customization.
■ It seamlessly integrates with existing data structure, allowing further styling, constraints, and logic adjustments.
■ Clicking the "Cancel " button prevents the field from being created and redirects the user back to the "Add" tab.
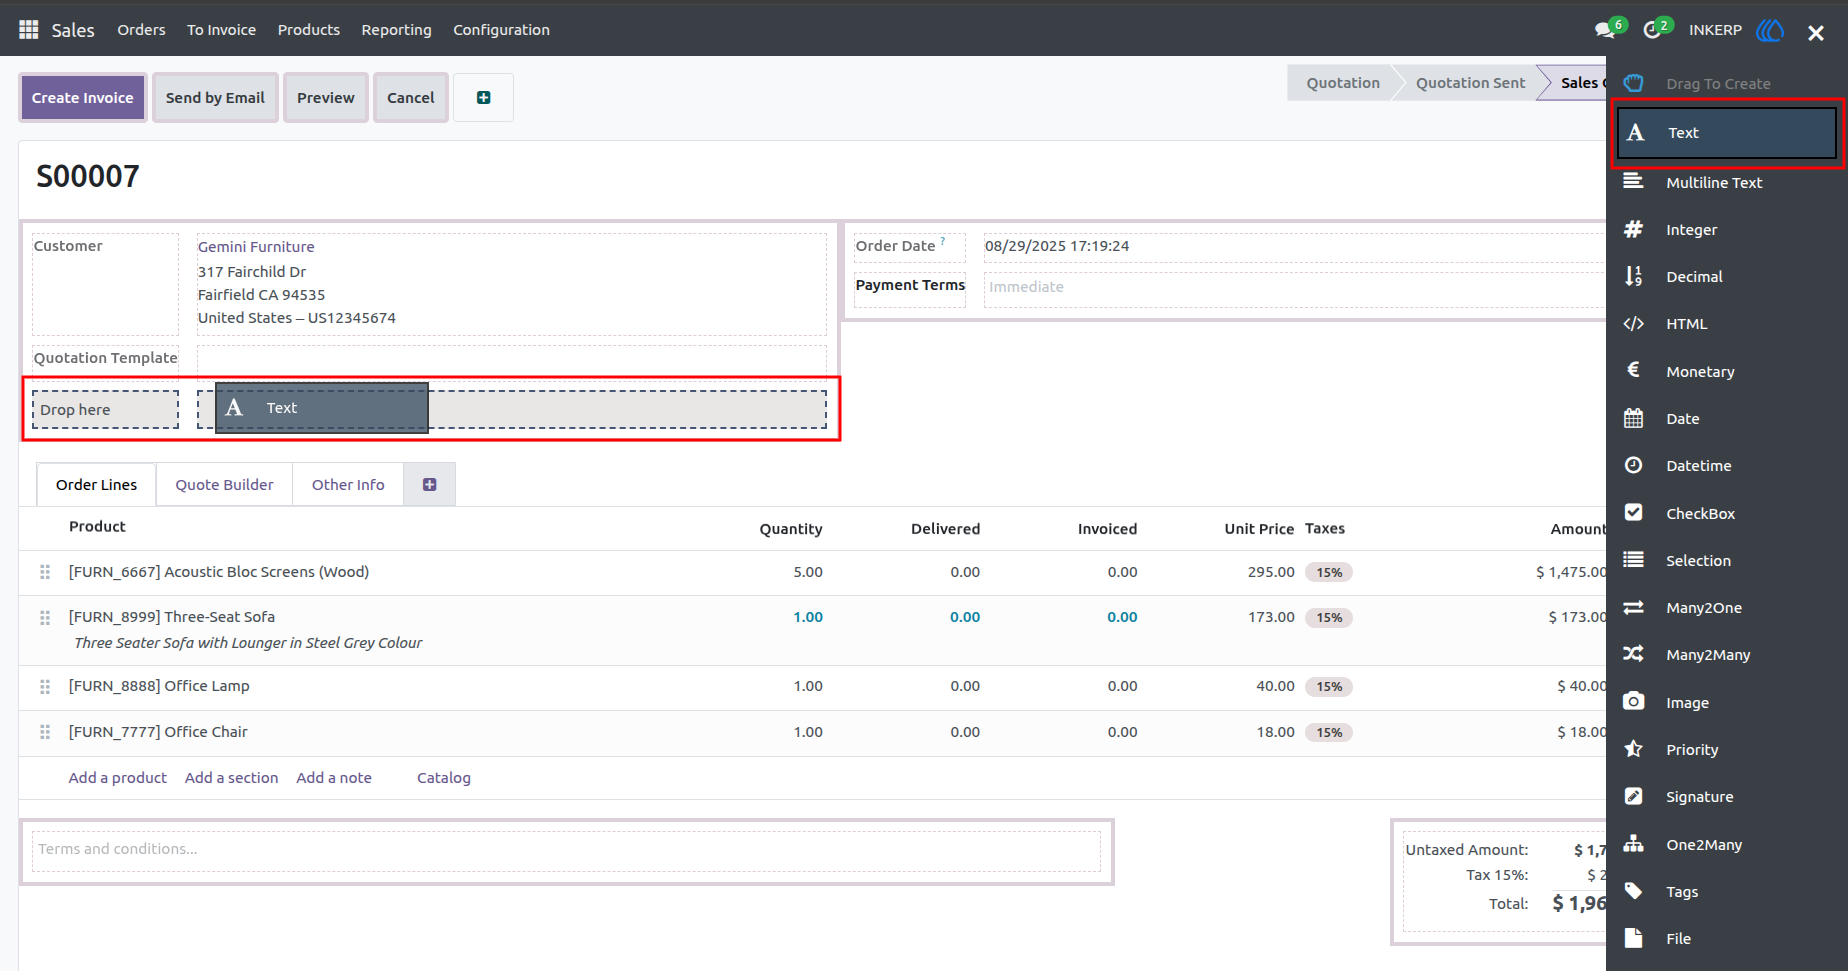
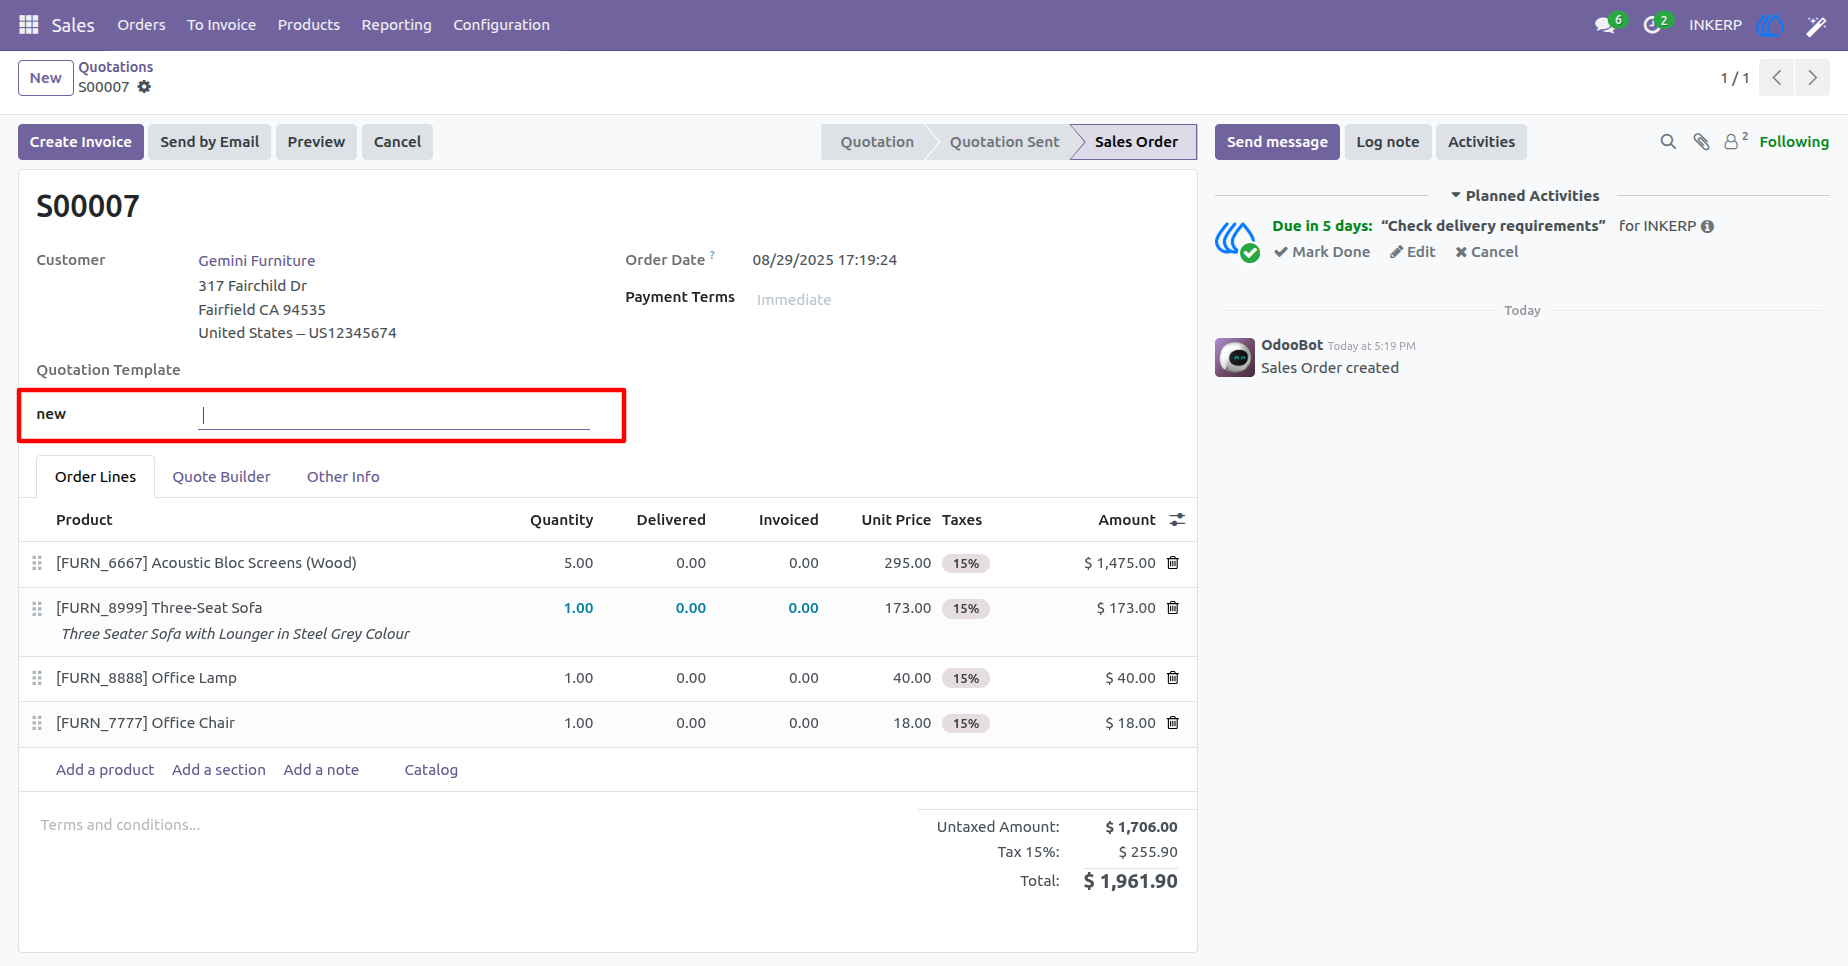
5. New Field View
The image displays an Odoo sales order screen where a new field labelled "new" has been created from Pixel. This newly added field was generated after clicking the "Create Field" button in Pixel.
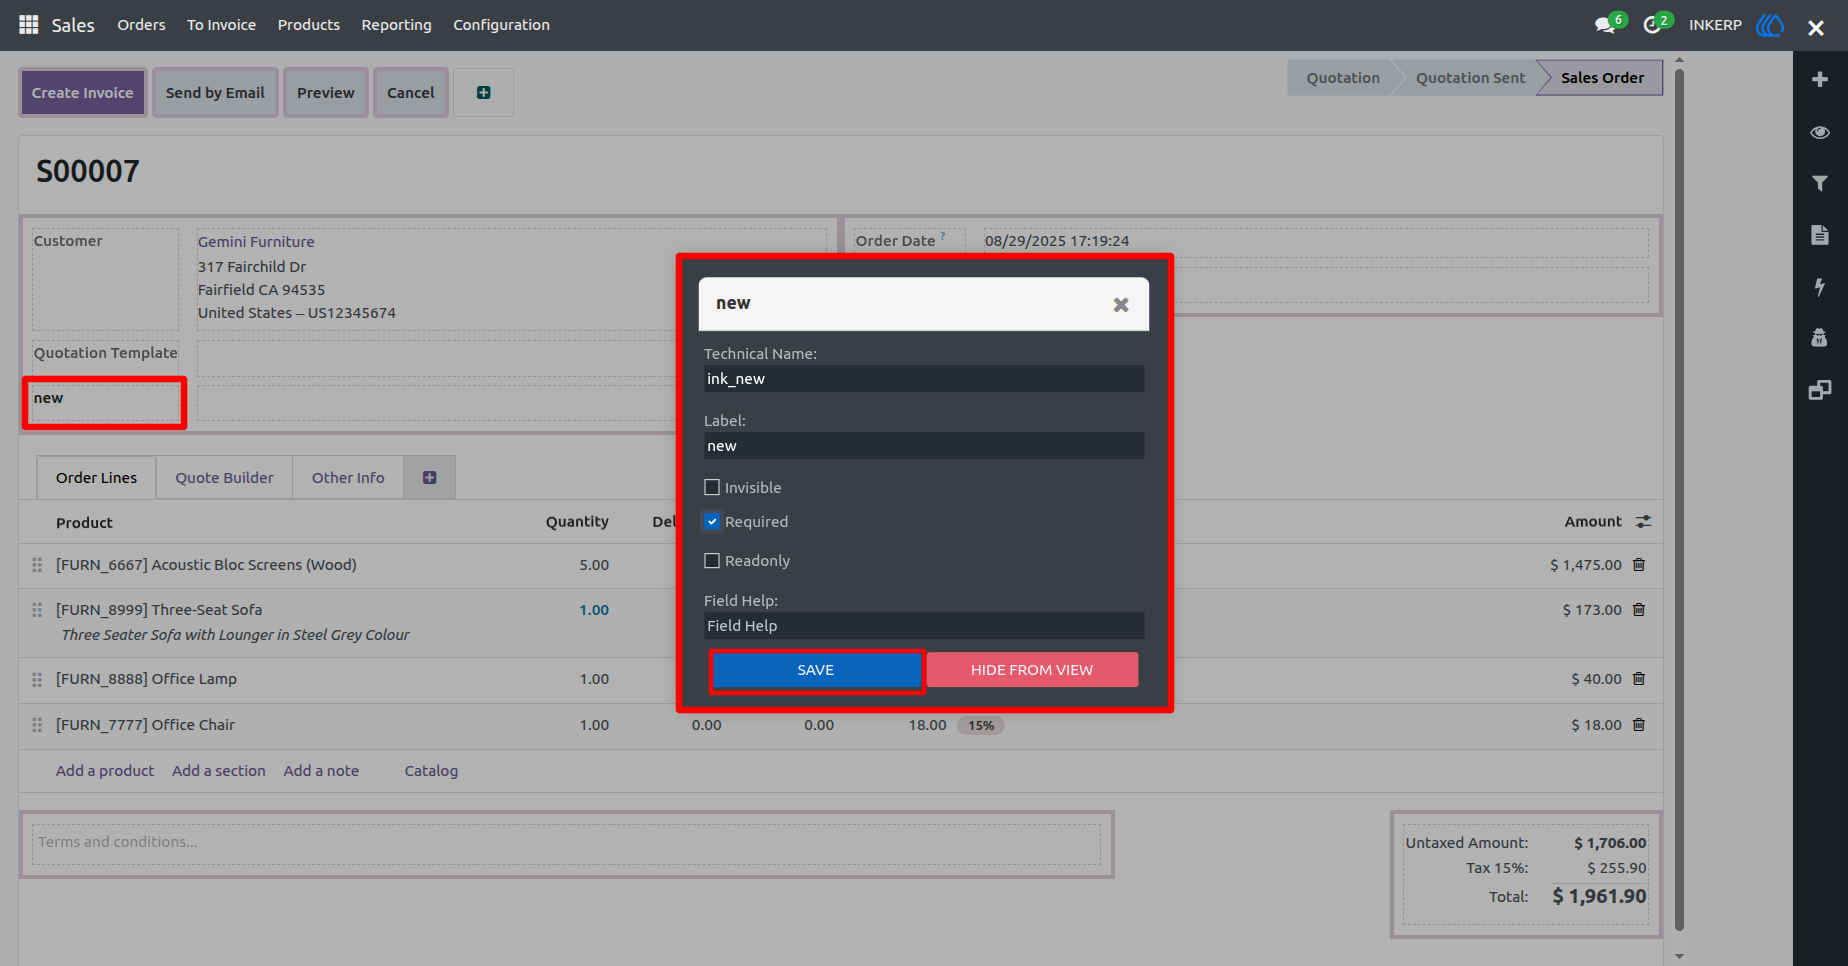
6. Edit Field View
The image shows the Pixel interface in action. In this screenshot, the user has selected an existing field, labelled as "new" and its properties are displayed as a popup.
This panel provides several customization options:
Edit Field Properties : Users can modify attributes such as making the field required, readonly, or adjusting its help description.
Hide Field from View : There is an option to make the field invisible, ensuring it does not appear in the form or tree.
These features allow Odoo users to refine their interface, ensuring a smooth workflow while maintaining system flexibility.
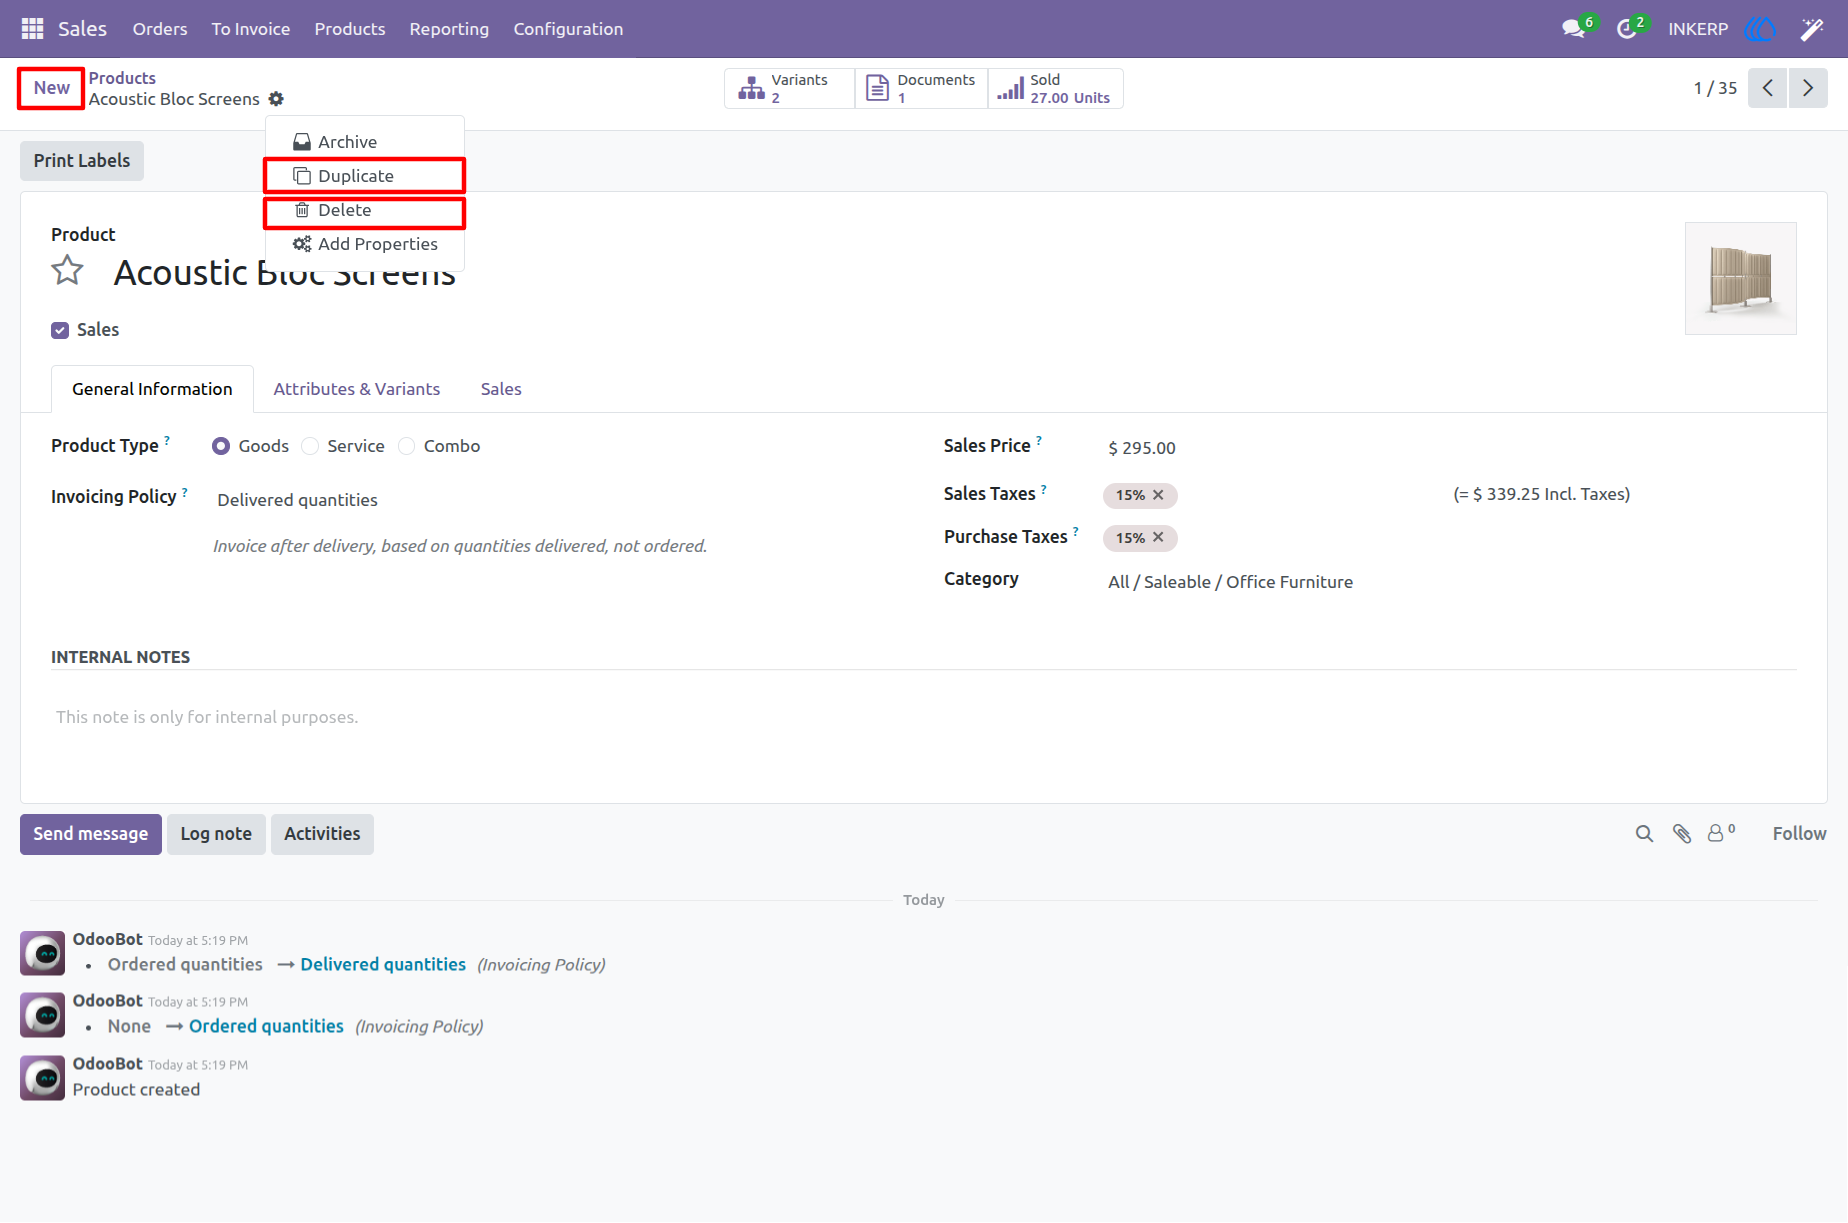
7. Before Edit View Access
Here, users have access to create, edit, delete, and duplicate records.
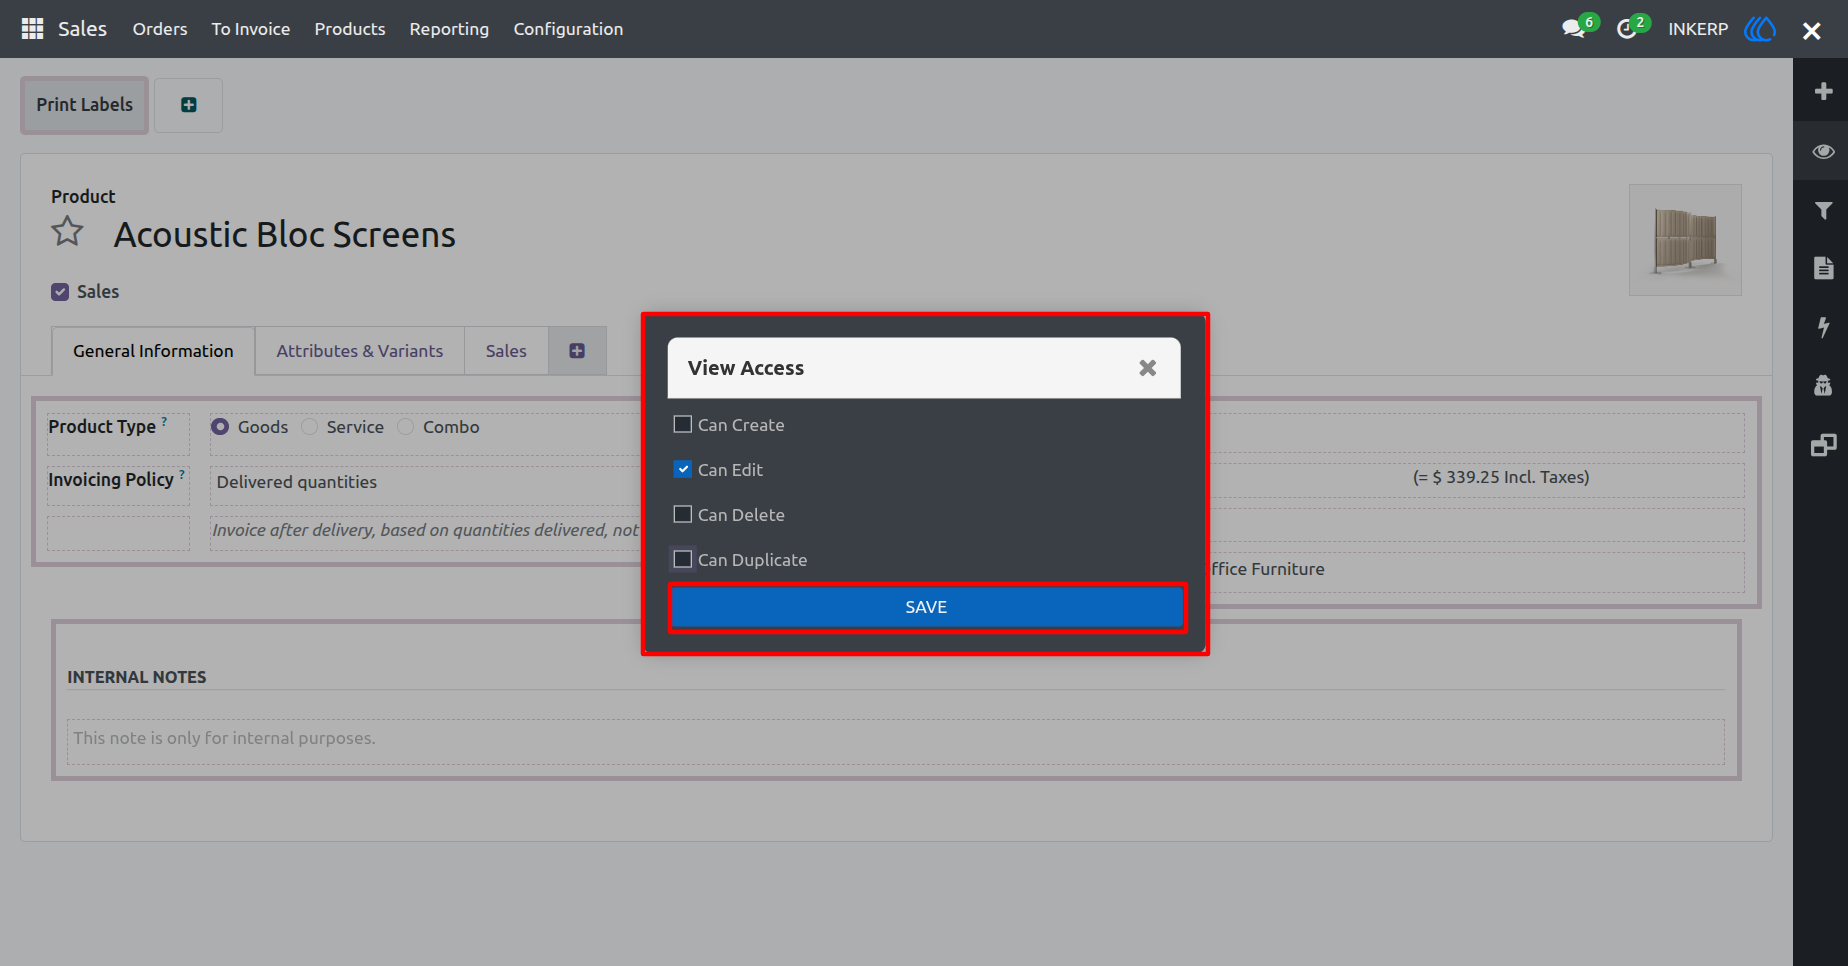
8. Pixel View Access
Pixel interface, where users can modify view access permissions. The options available allow customization of actions like:
Creating Records : Users can enable or disable the ability to add new entries.
Editing Records : The edit permission controls whether existing data can be modified.
Duplicating Records : Users can manage whether entries can be copied.
Deleting Records : This setting determines whether records can be removed from the system.
9. After Edit View Access
Here, the user can see that the Create button, Delete action, and Duplicate action are not visible after editing from Odoo pixel.
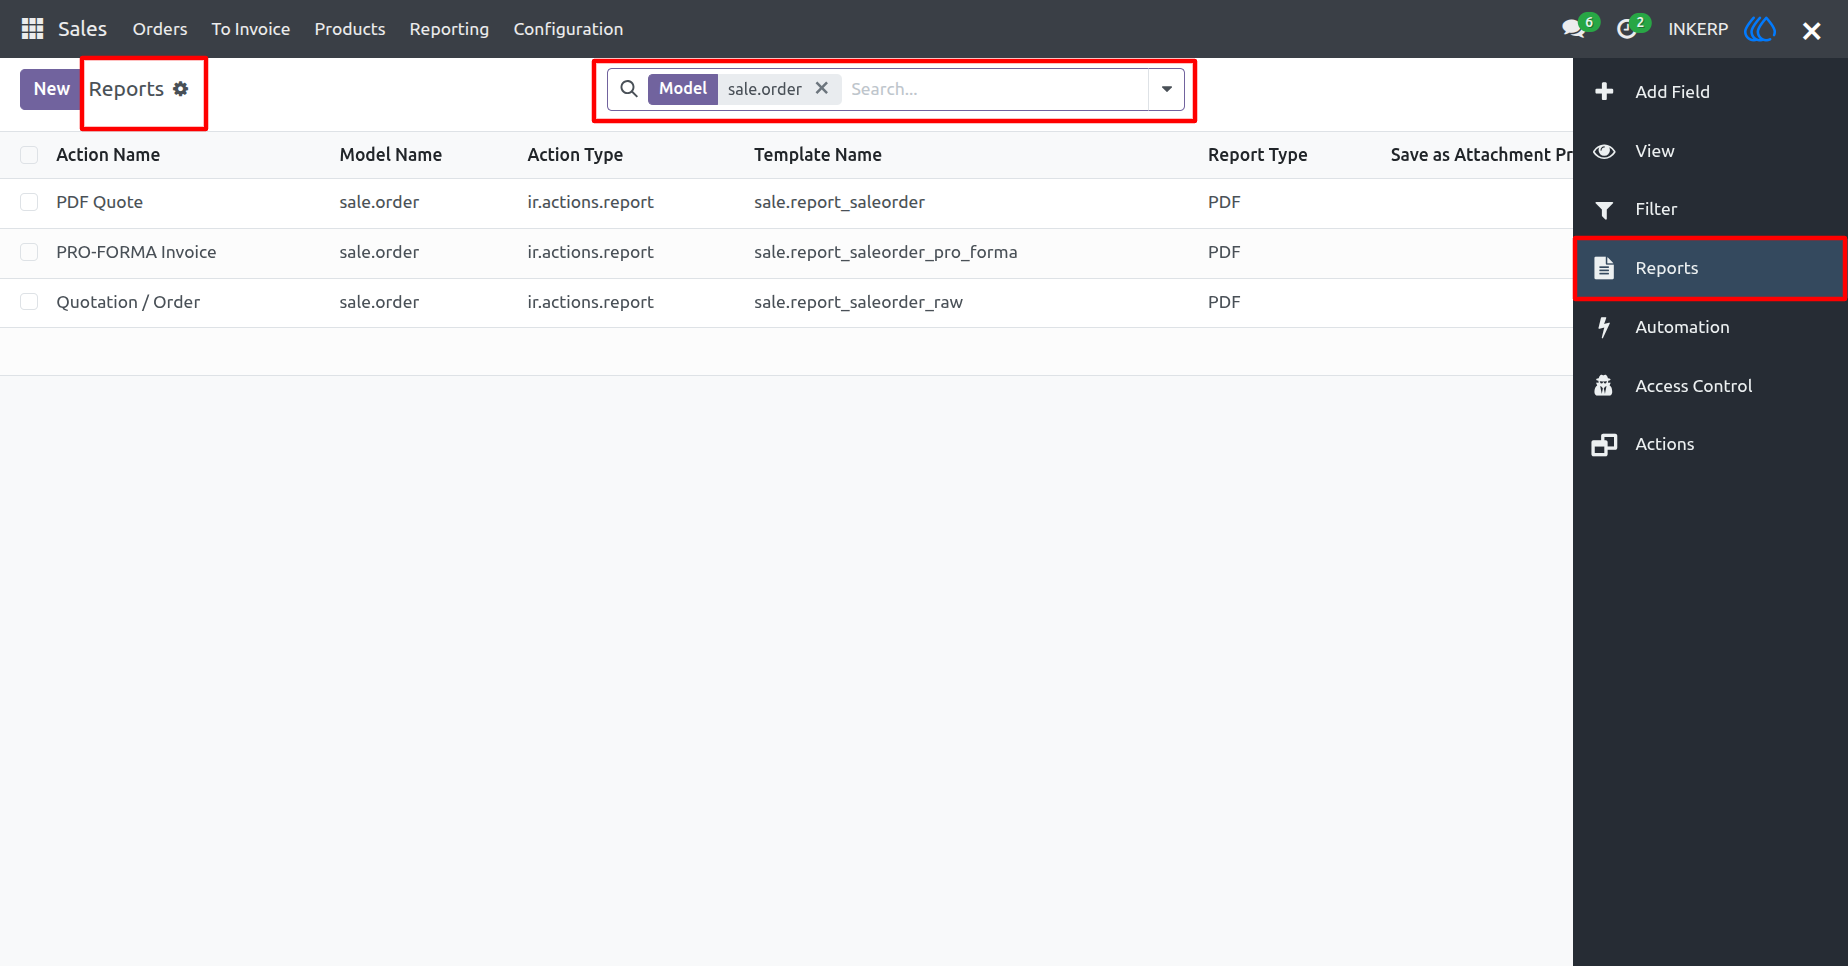
10. Reports View
Here, the user can navigate to Reports from the pixel menu to see the Reports related to a particular model, and the user can also create a report for the particular model.
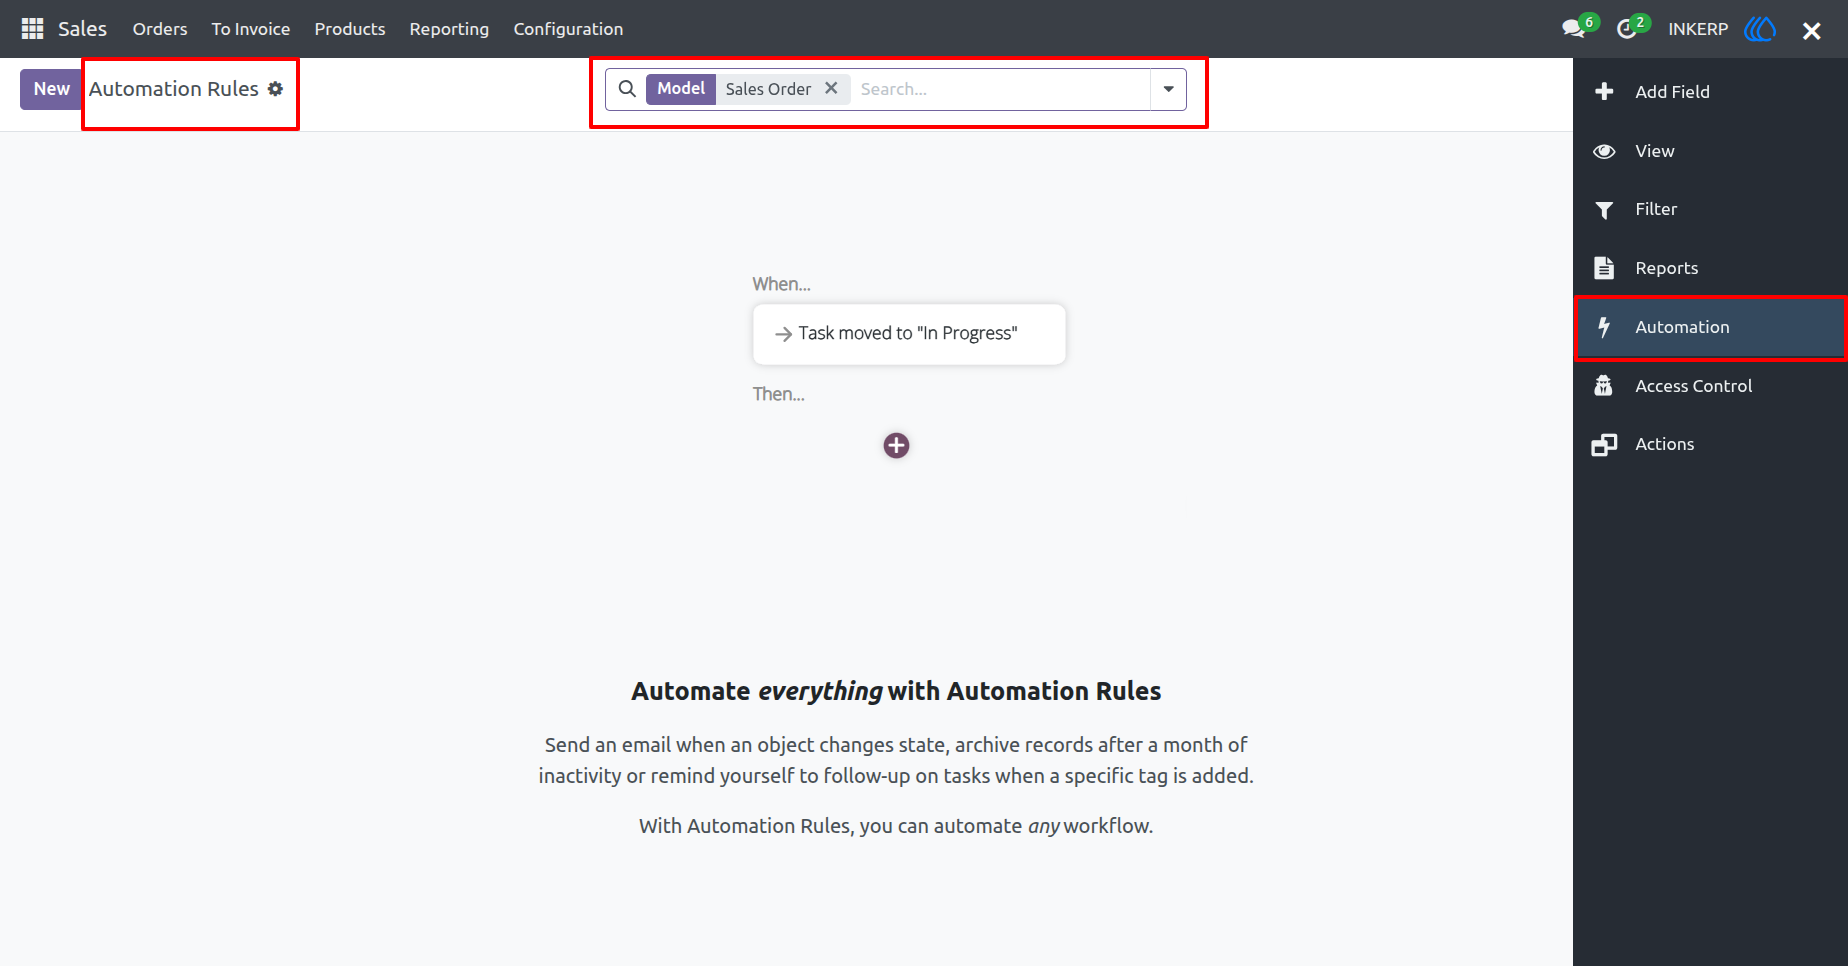
11. Automation Rules View
Here, the user can navigate to Automation from the pixel menu to see the Automation Rules related to a particular model, and user can also create automation rules for the particular model.
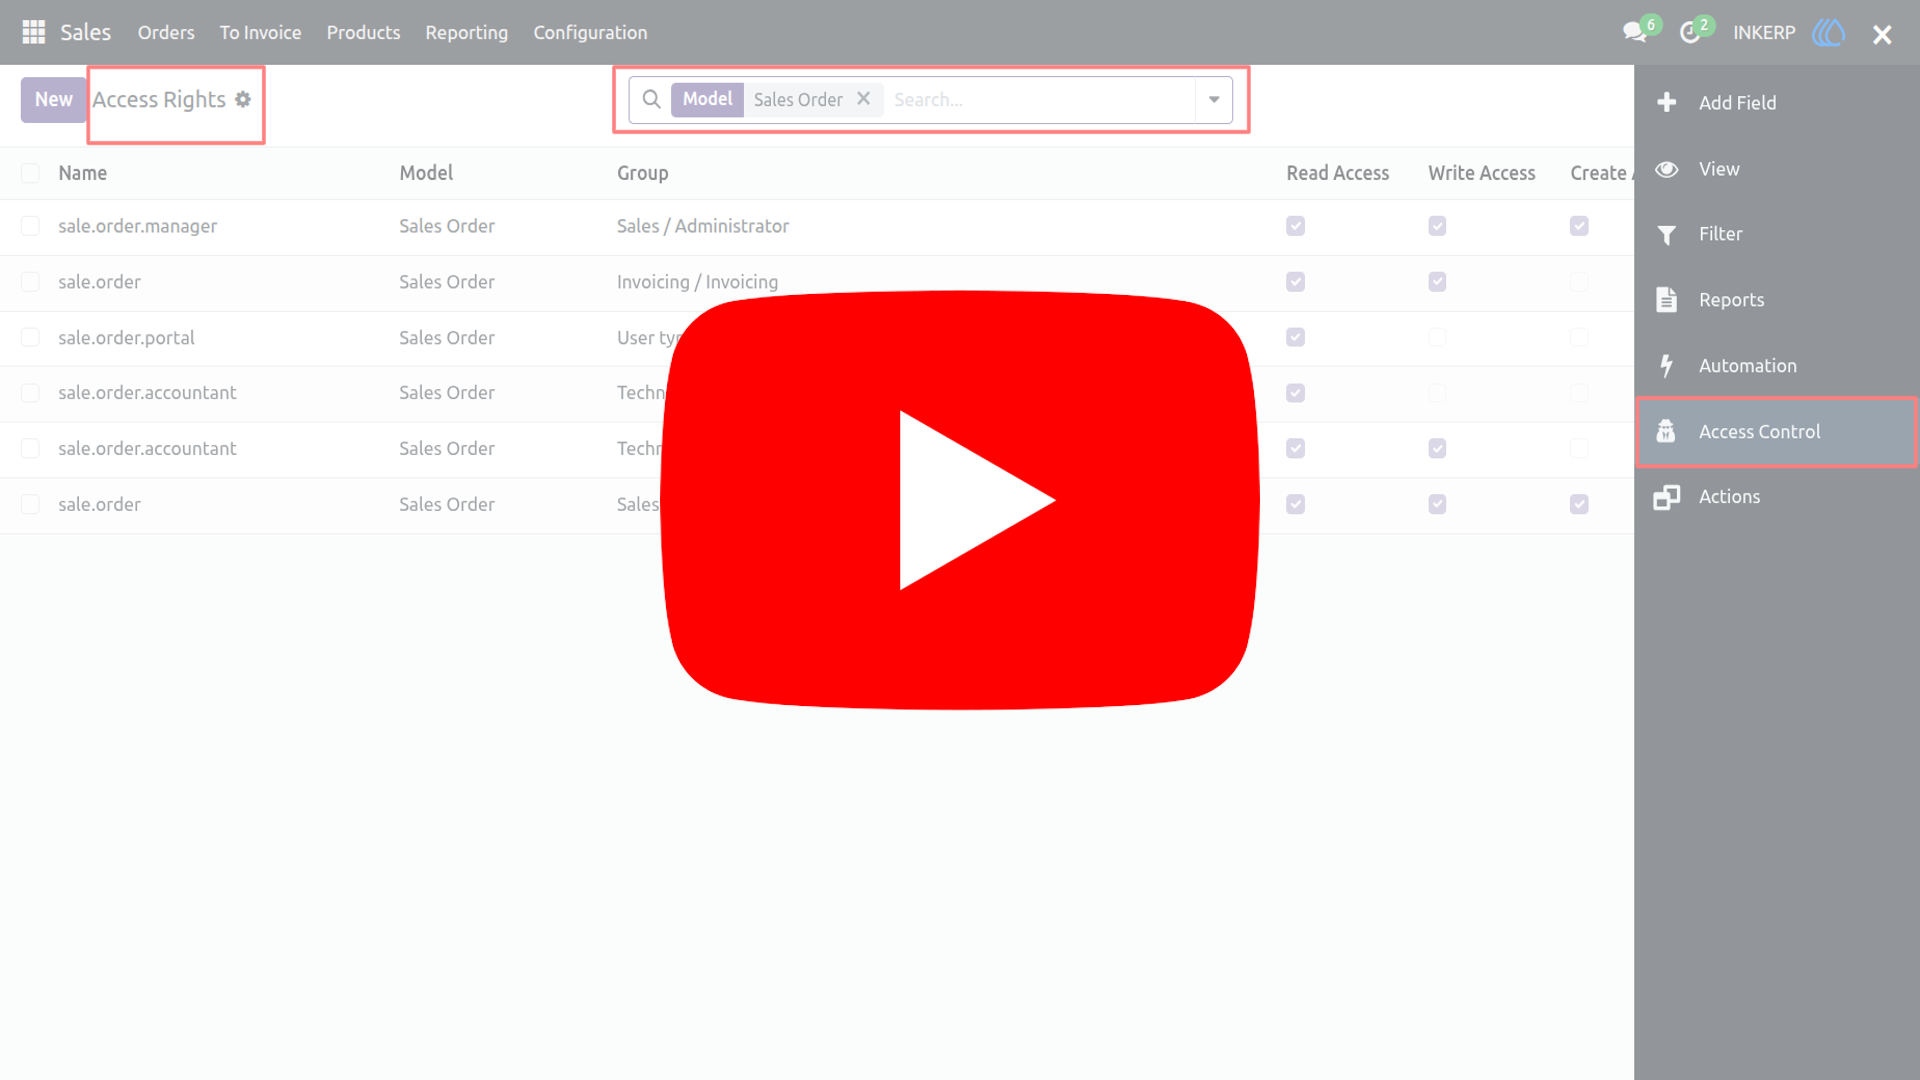
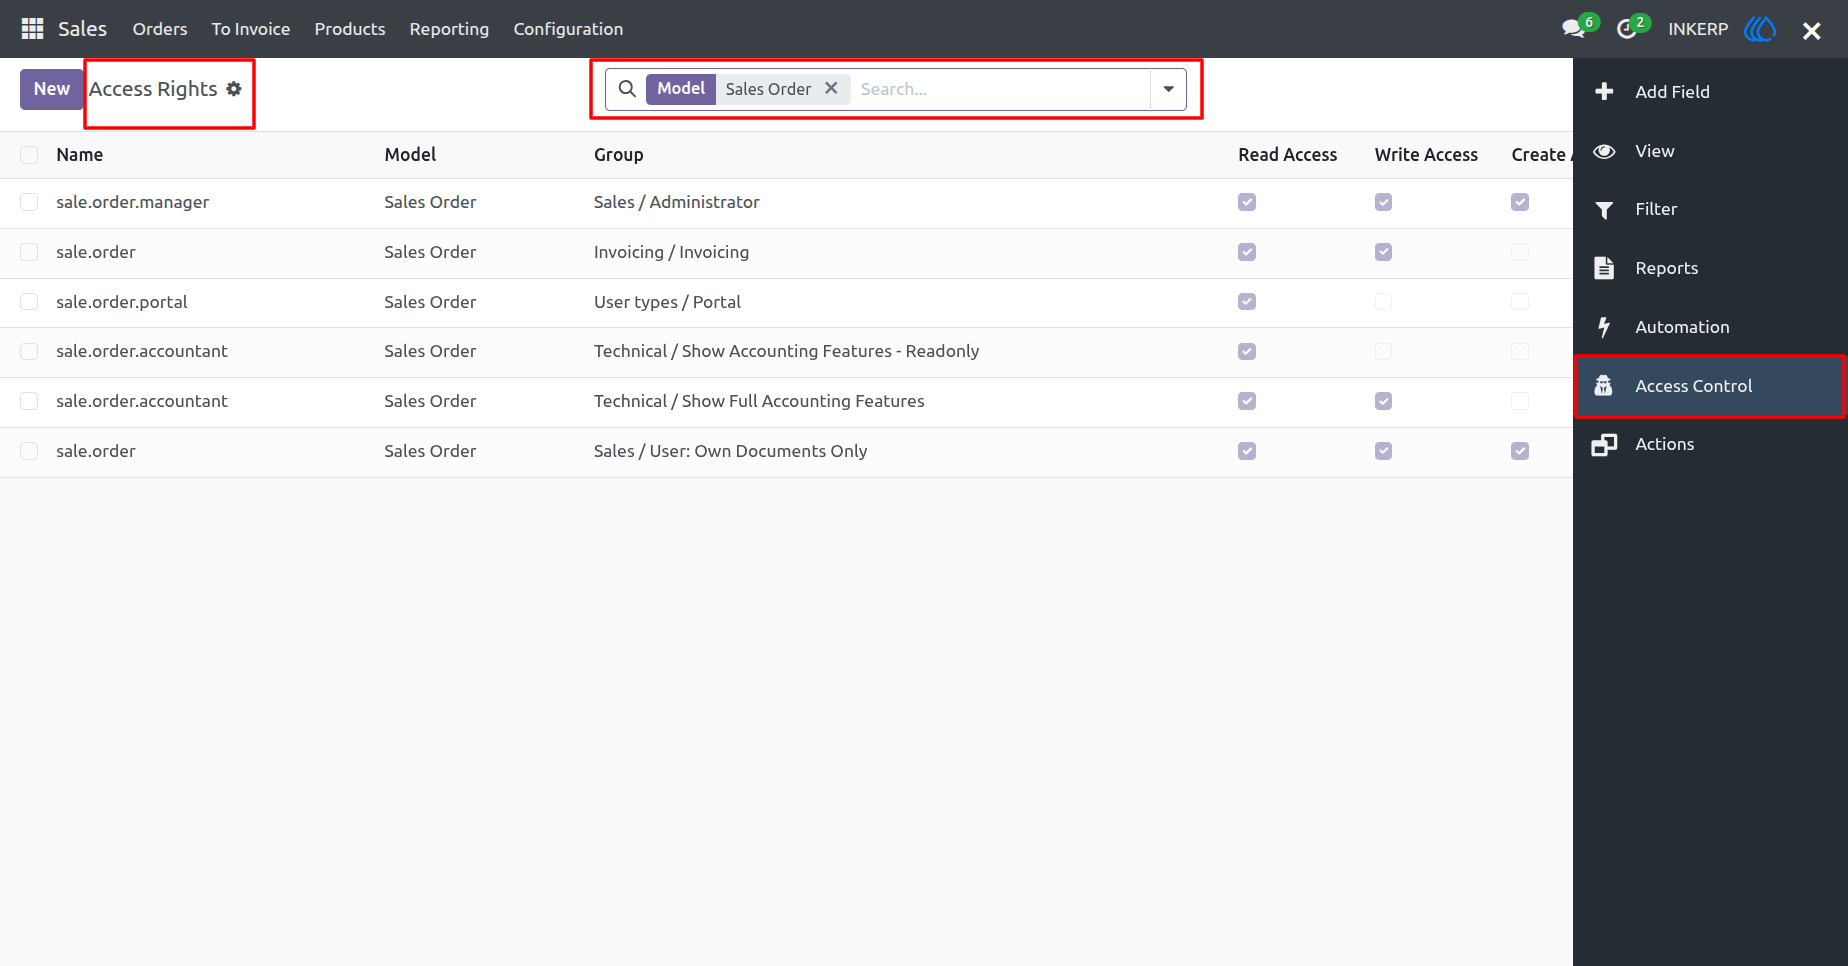
12. Access Control View
Here, the user can navigate to Access Control from the pixel menu to see the Access Rights related to a particular model, and the user can also create access rights for the particular model.
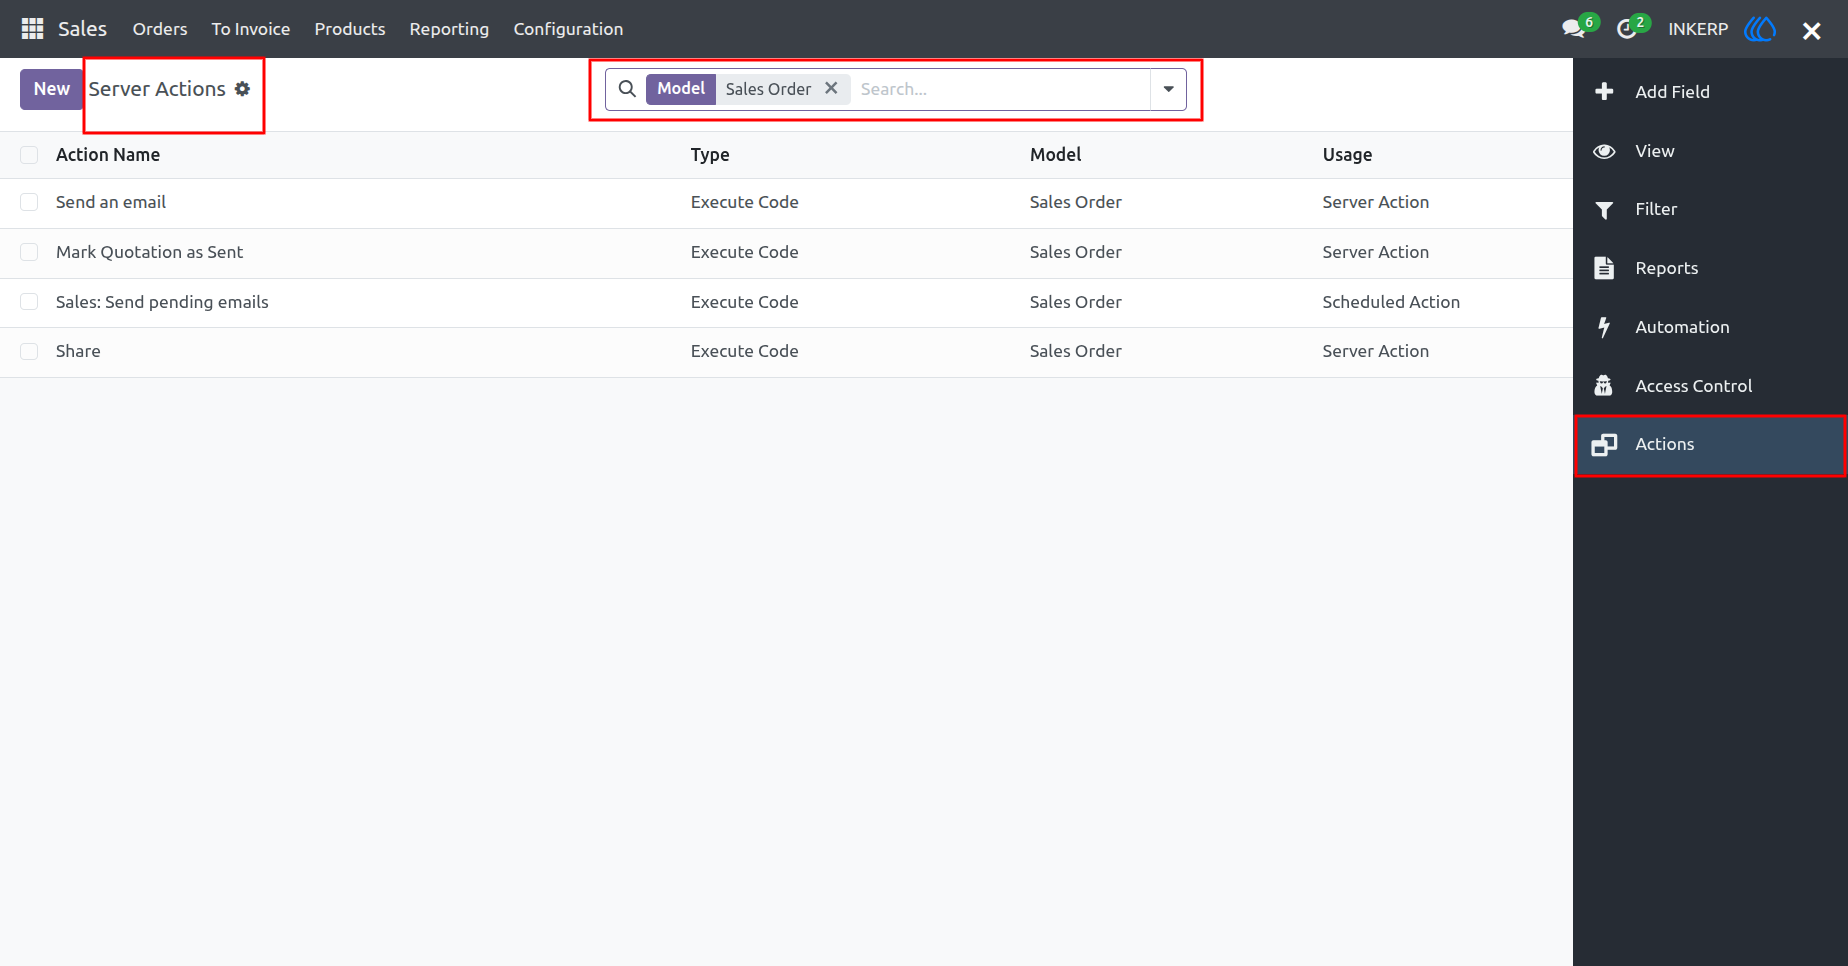
13. Actions View
Here, the user can navigate to Actions from the pixel menu to see the Server Actions related to a particular model, and the user can also create server actions for the particular model.
14. Filter Rules View
Here, the user can navigate to Filter Rules from the pixel menu to see the User Defined Filters related to a particular model, and the user can also create Filters for the particular model.

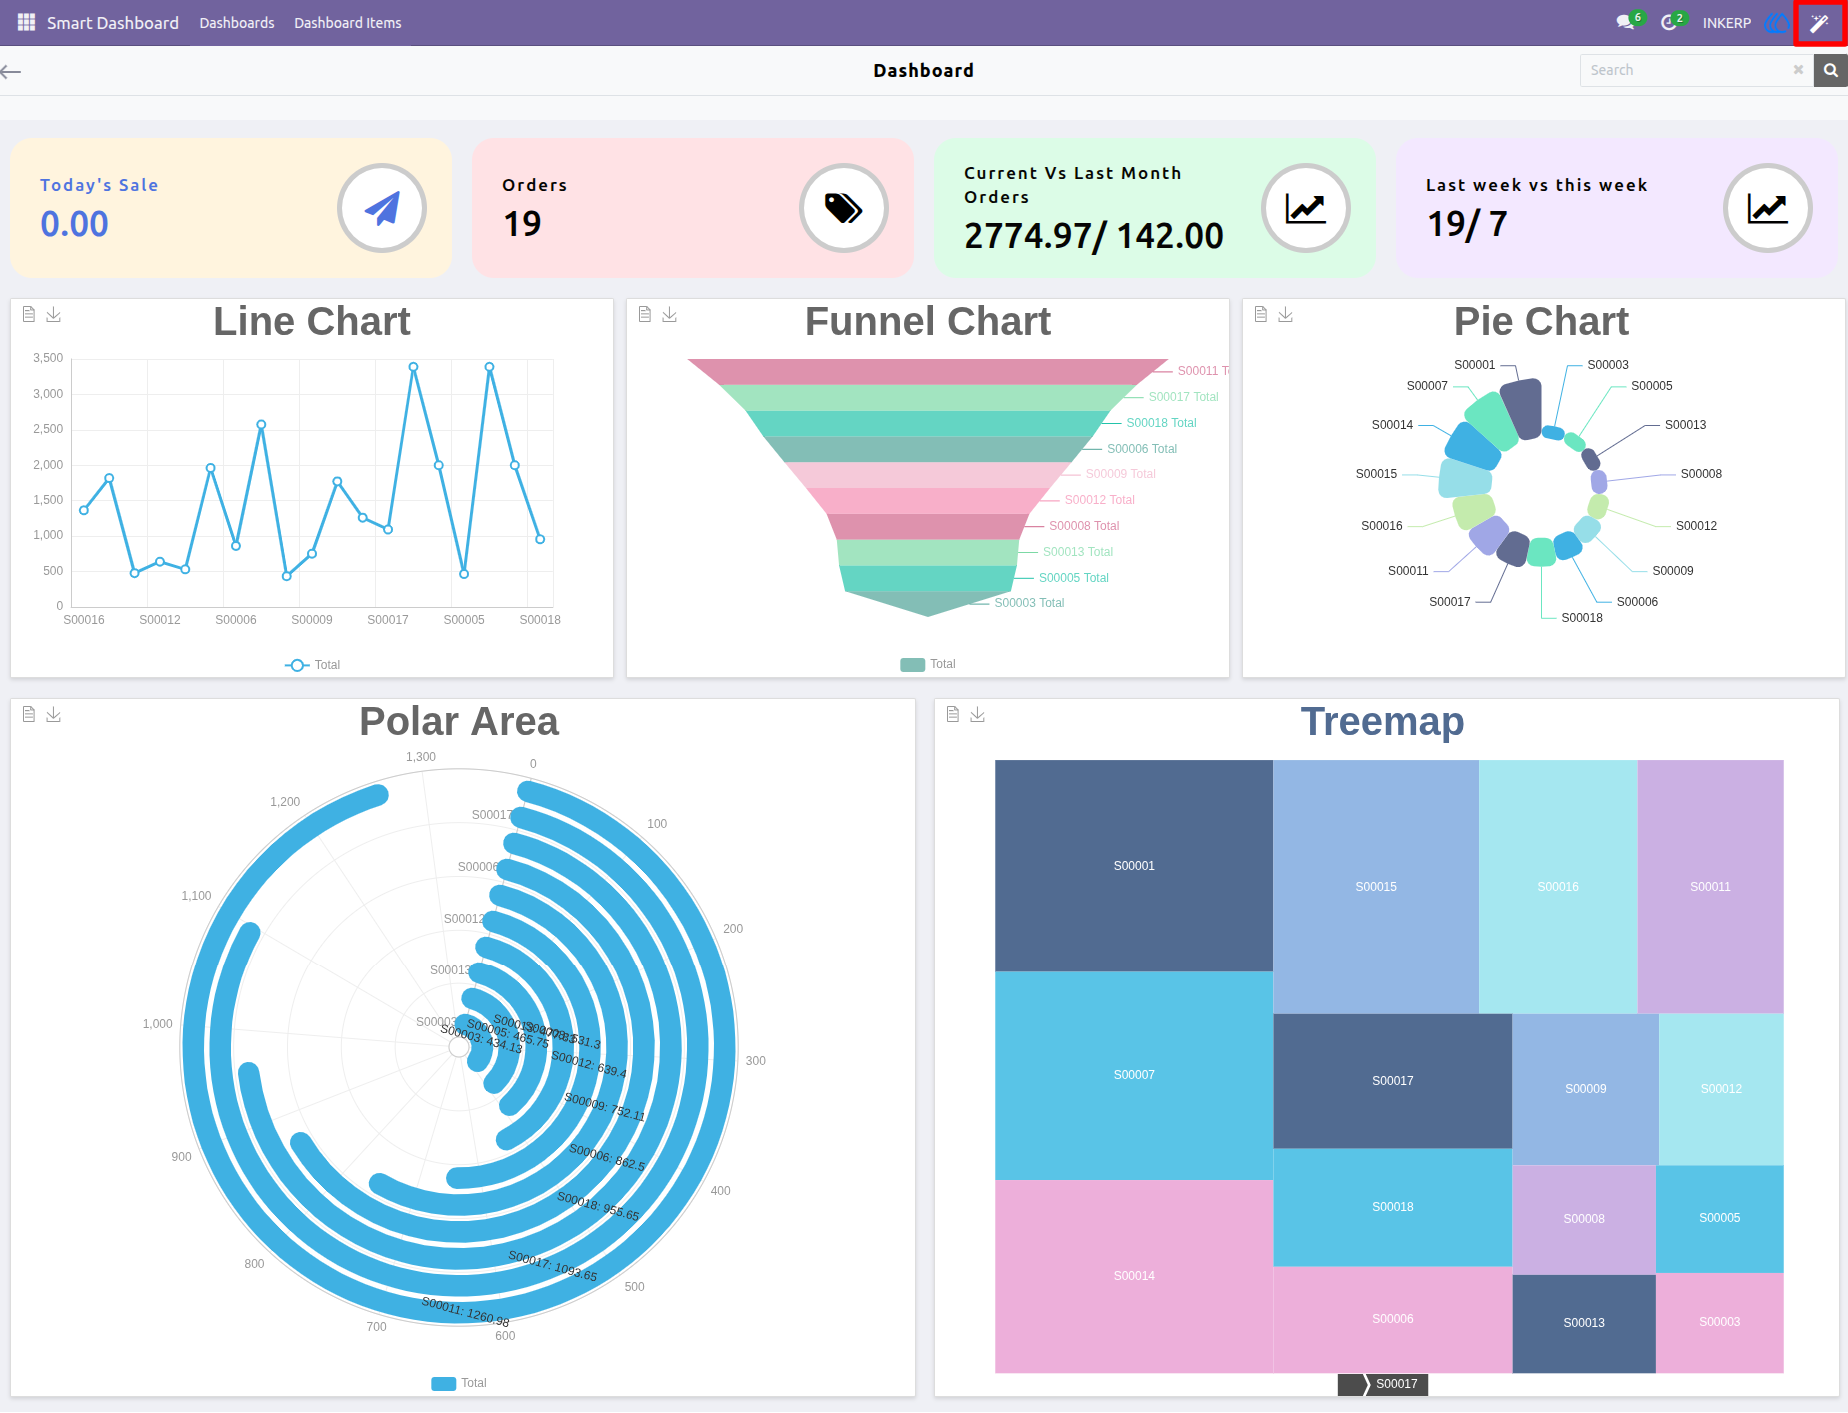
15. Pixel in Dashboard
Users can access pixel within the dashboard template view.
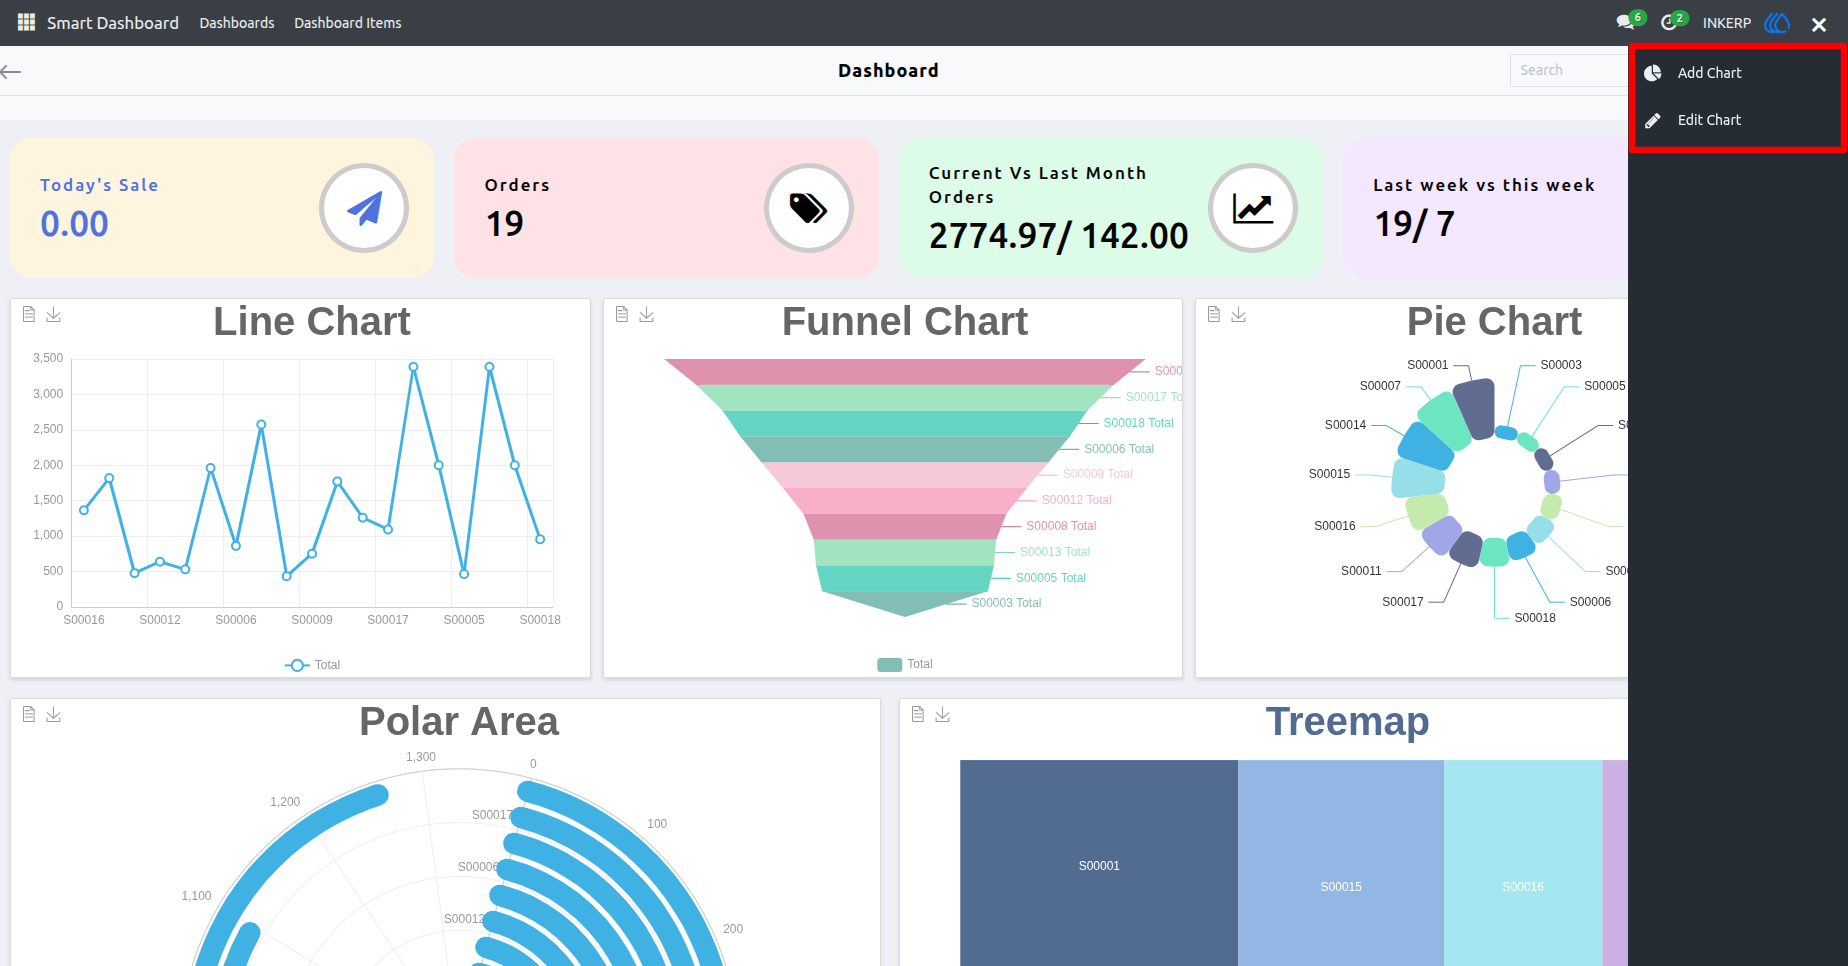
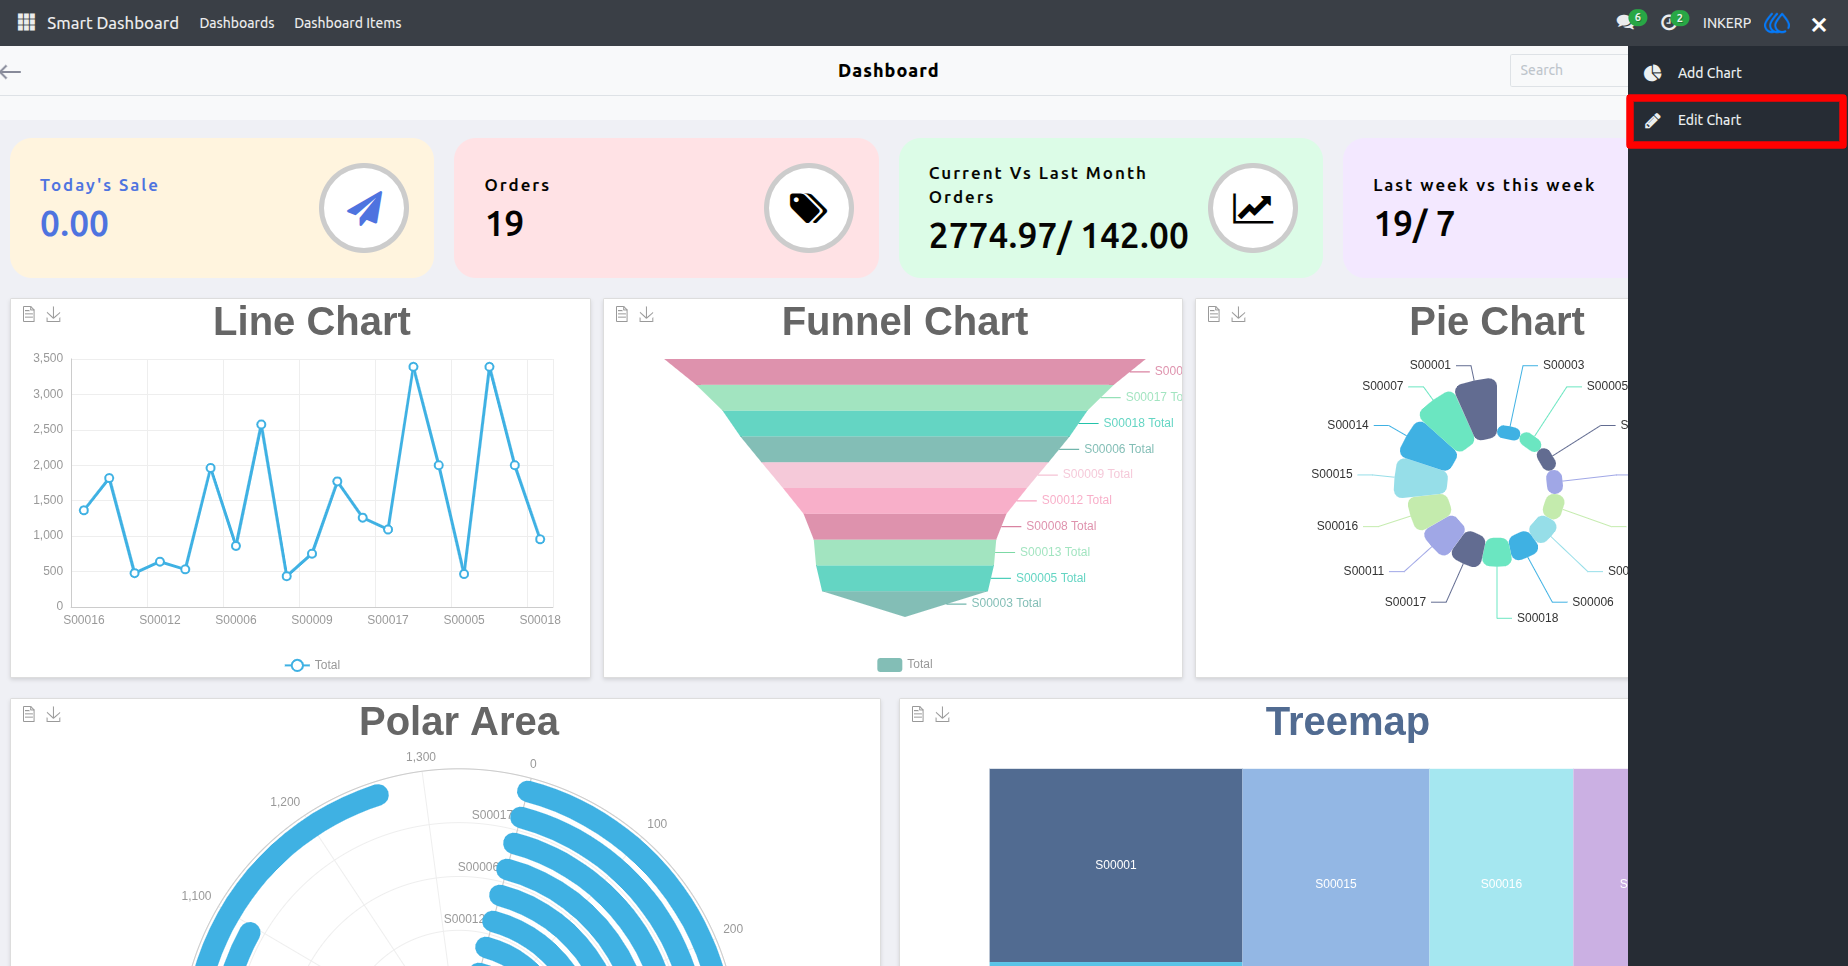
16. Pixel Sidebar View in Dashboard
In the Pixel sidebar, users will find two options for dashboard:
Add Chart : Opens an additional sidebar displaying available charts.
Edit Chart : Allows users to modify or delete existing charts.
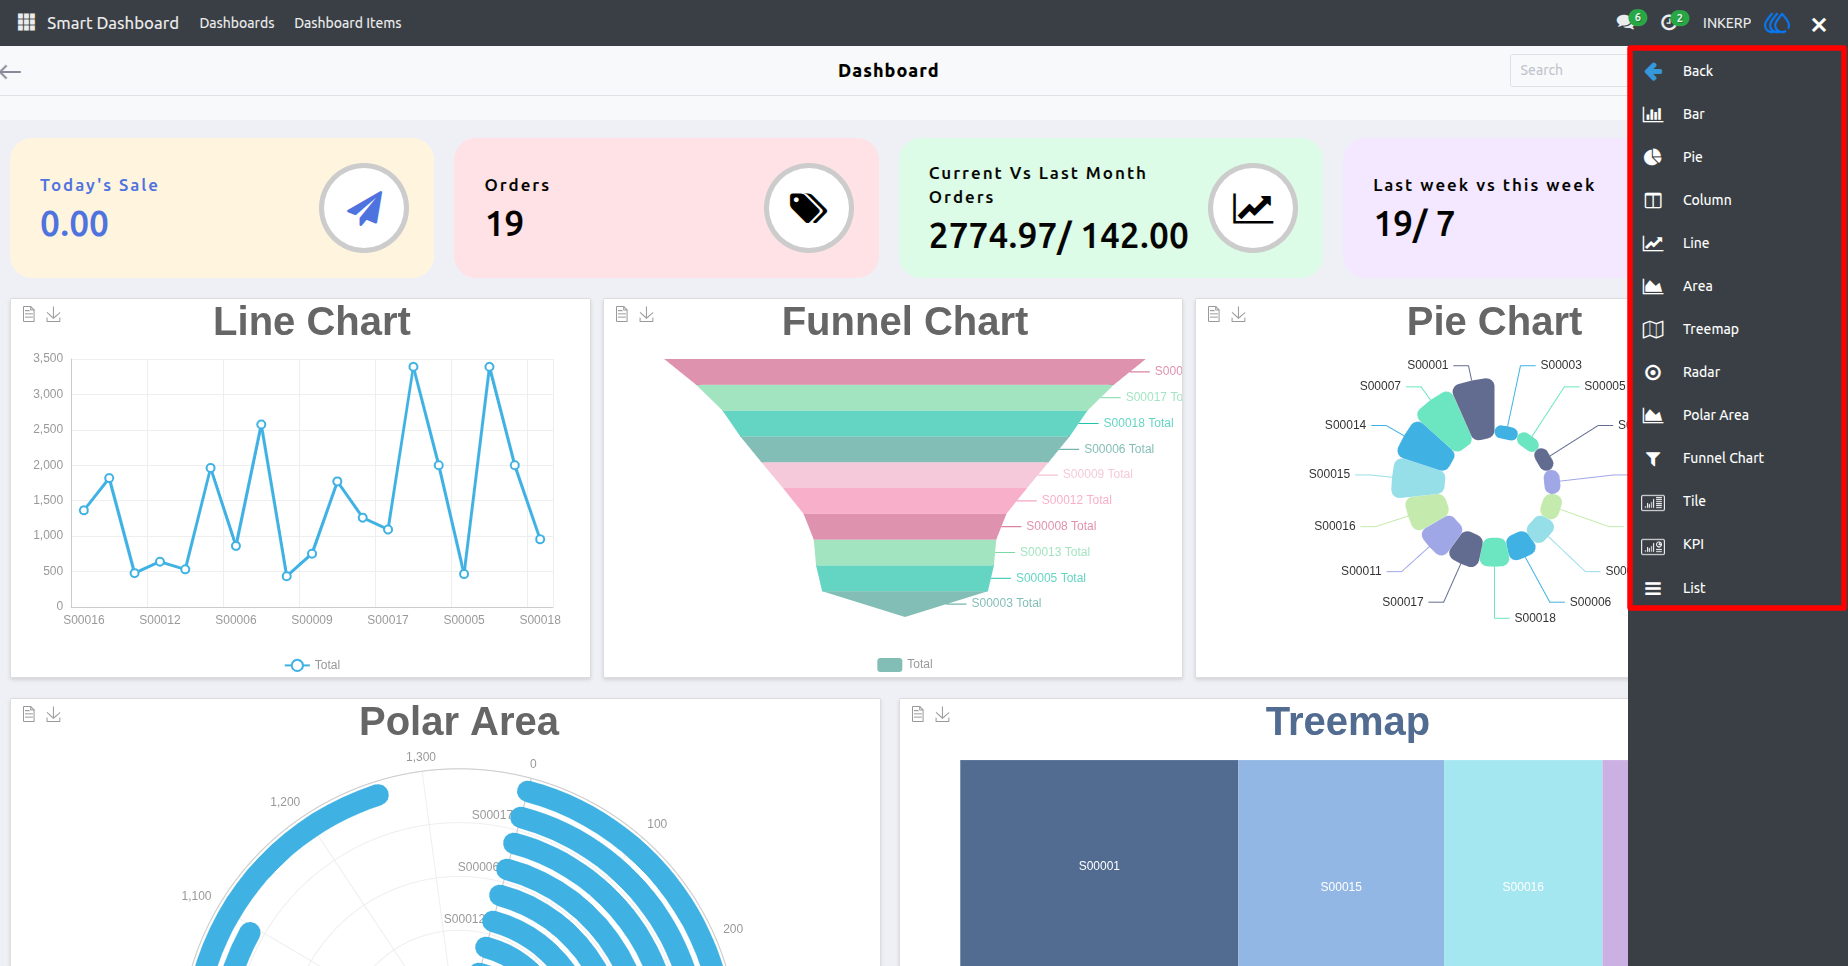
17. Add Chart Sidebar View
When the user clicks on 'Add Chart', a sidebar appears displaying a list of charts that can be easily dragged and dropped into the dashboard template.
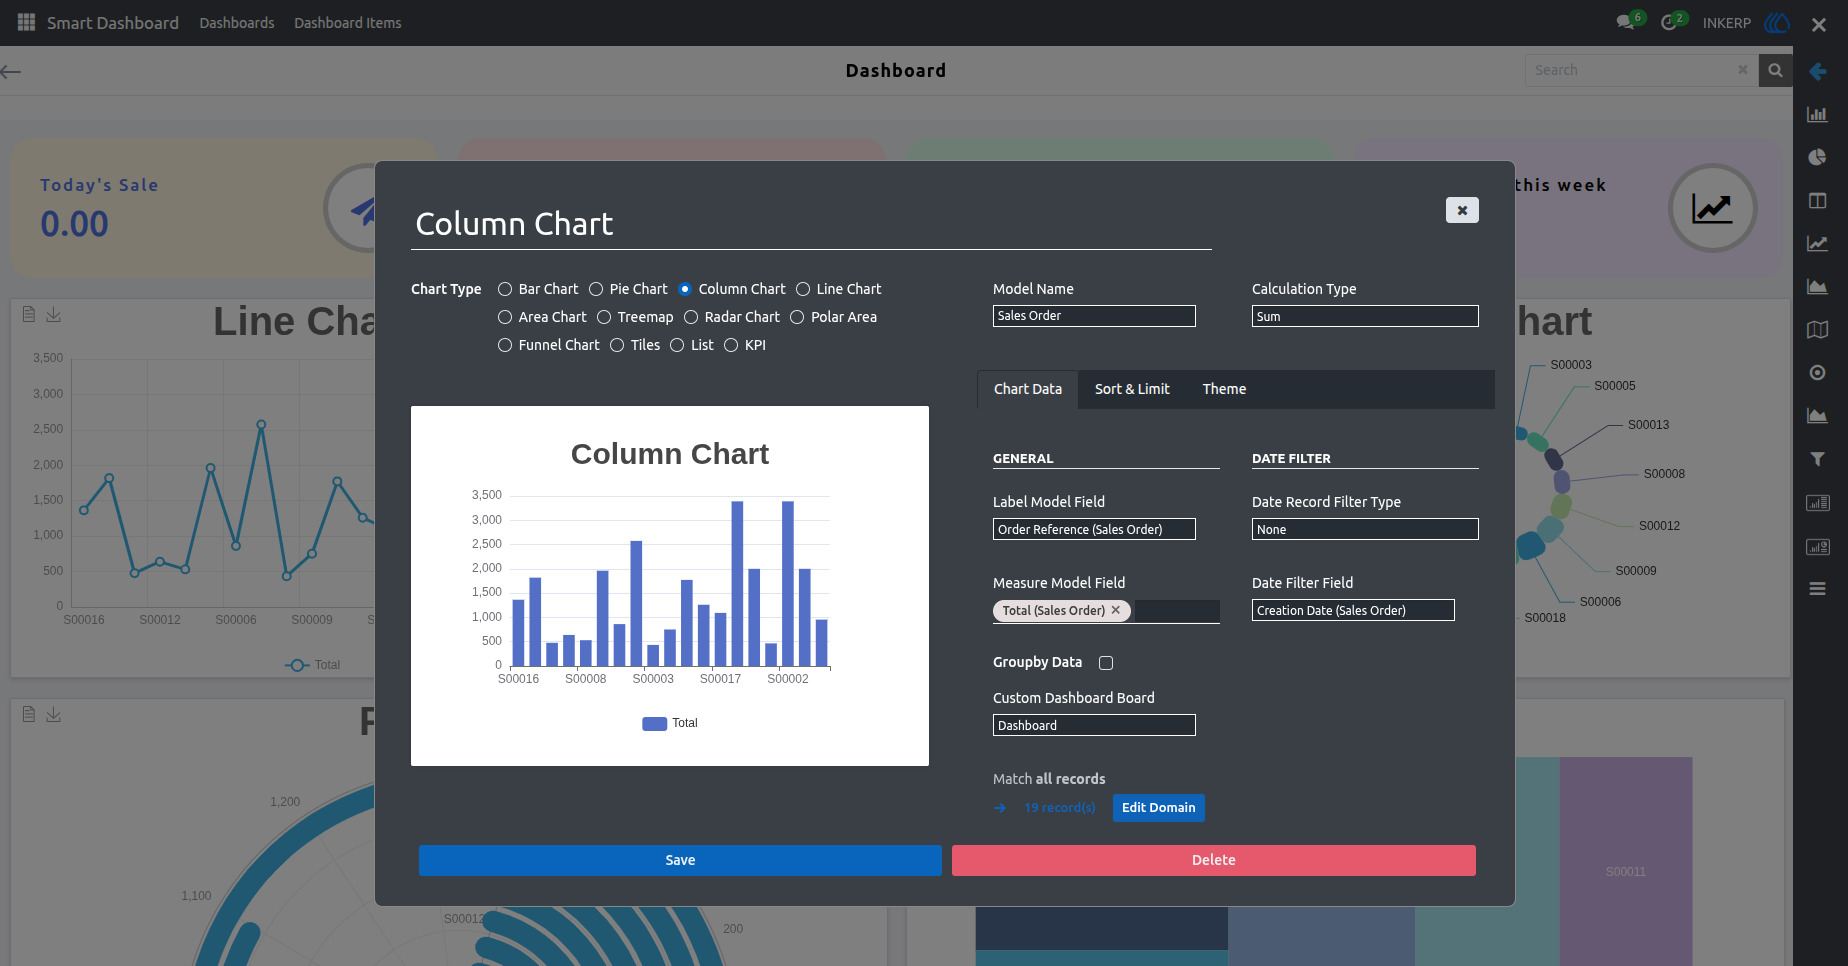
18. Dashboard Chart Property View
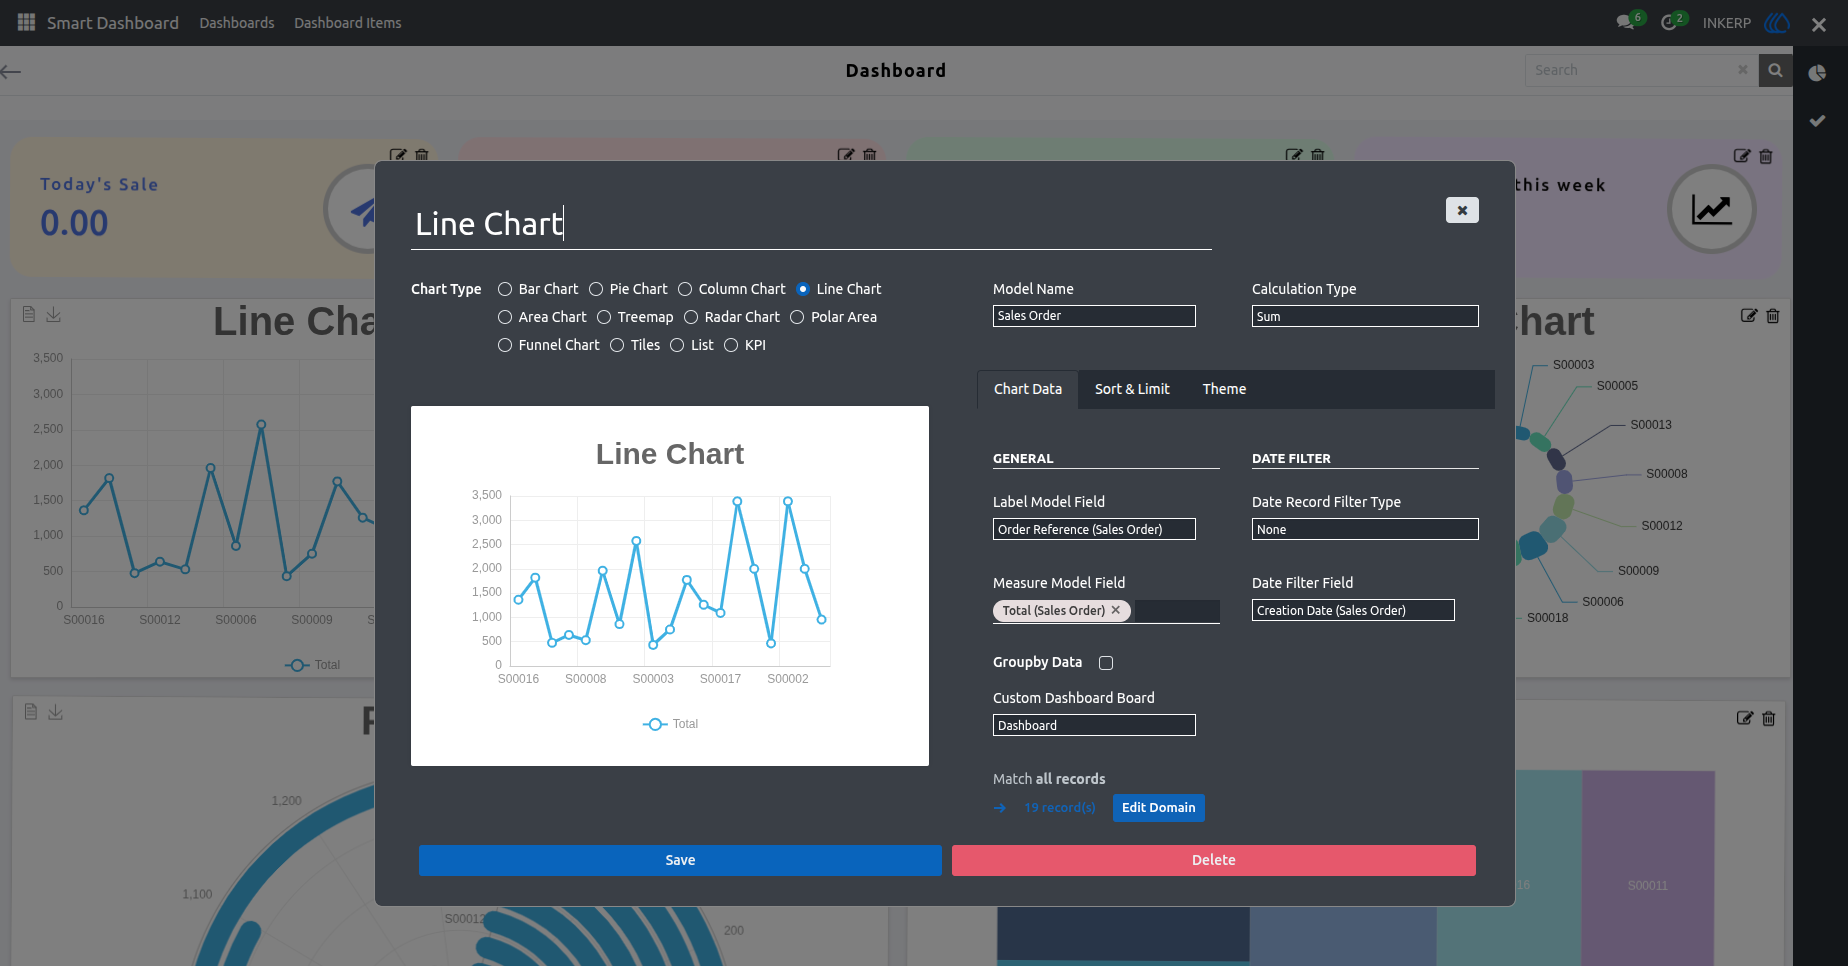
When the user drags and drops a chart button onto the dashboard template, a properties popup appears. In this view, user can configure chart details including model, theme, and field settings then click 'Save' and reload the page to display the newly added chart.
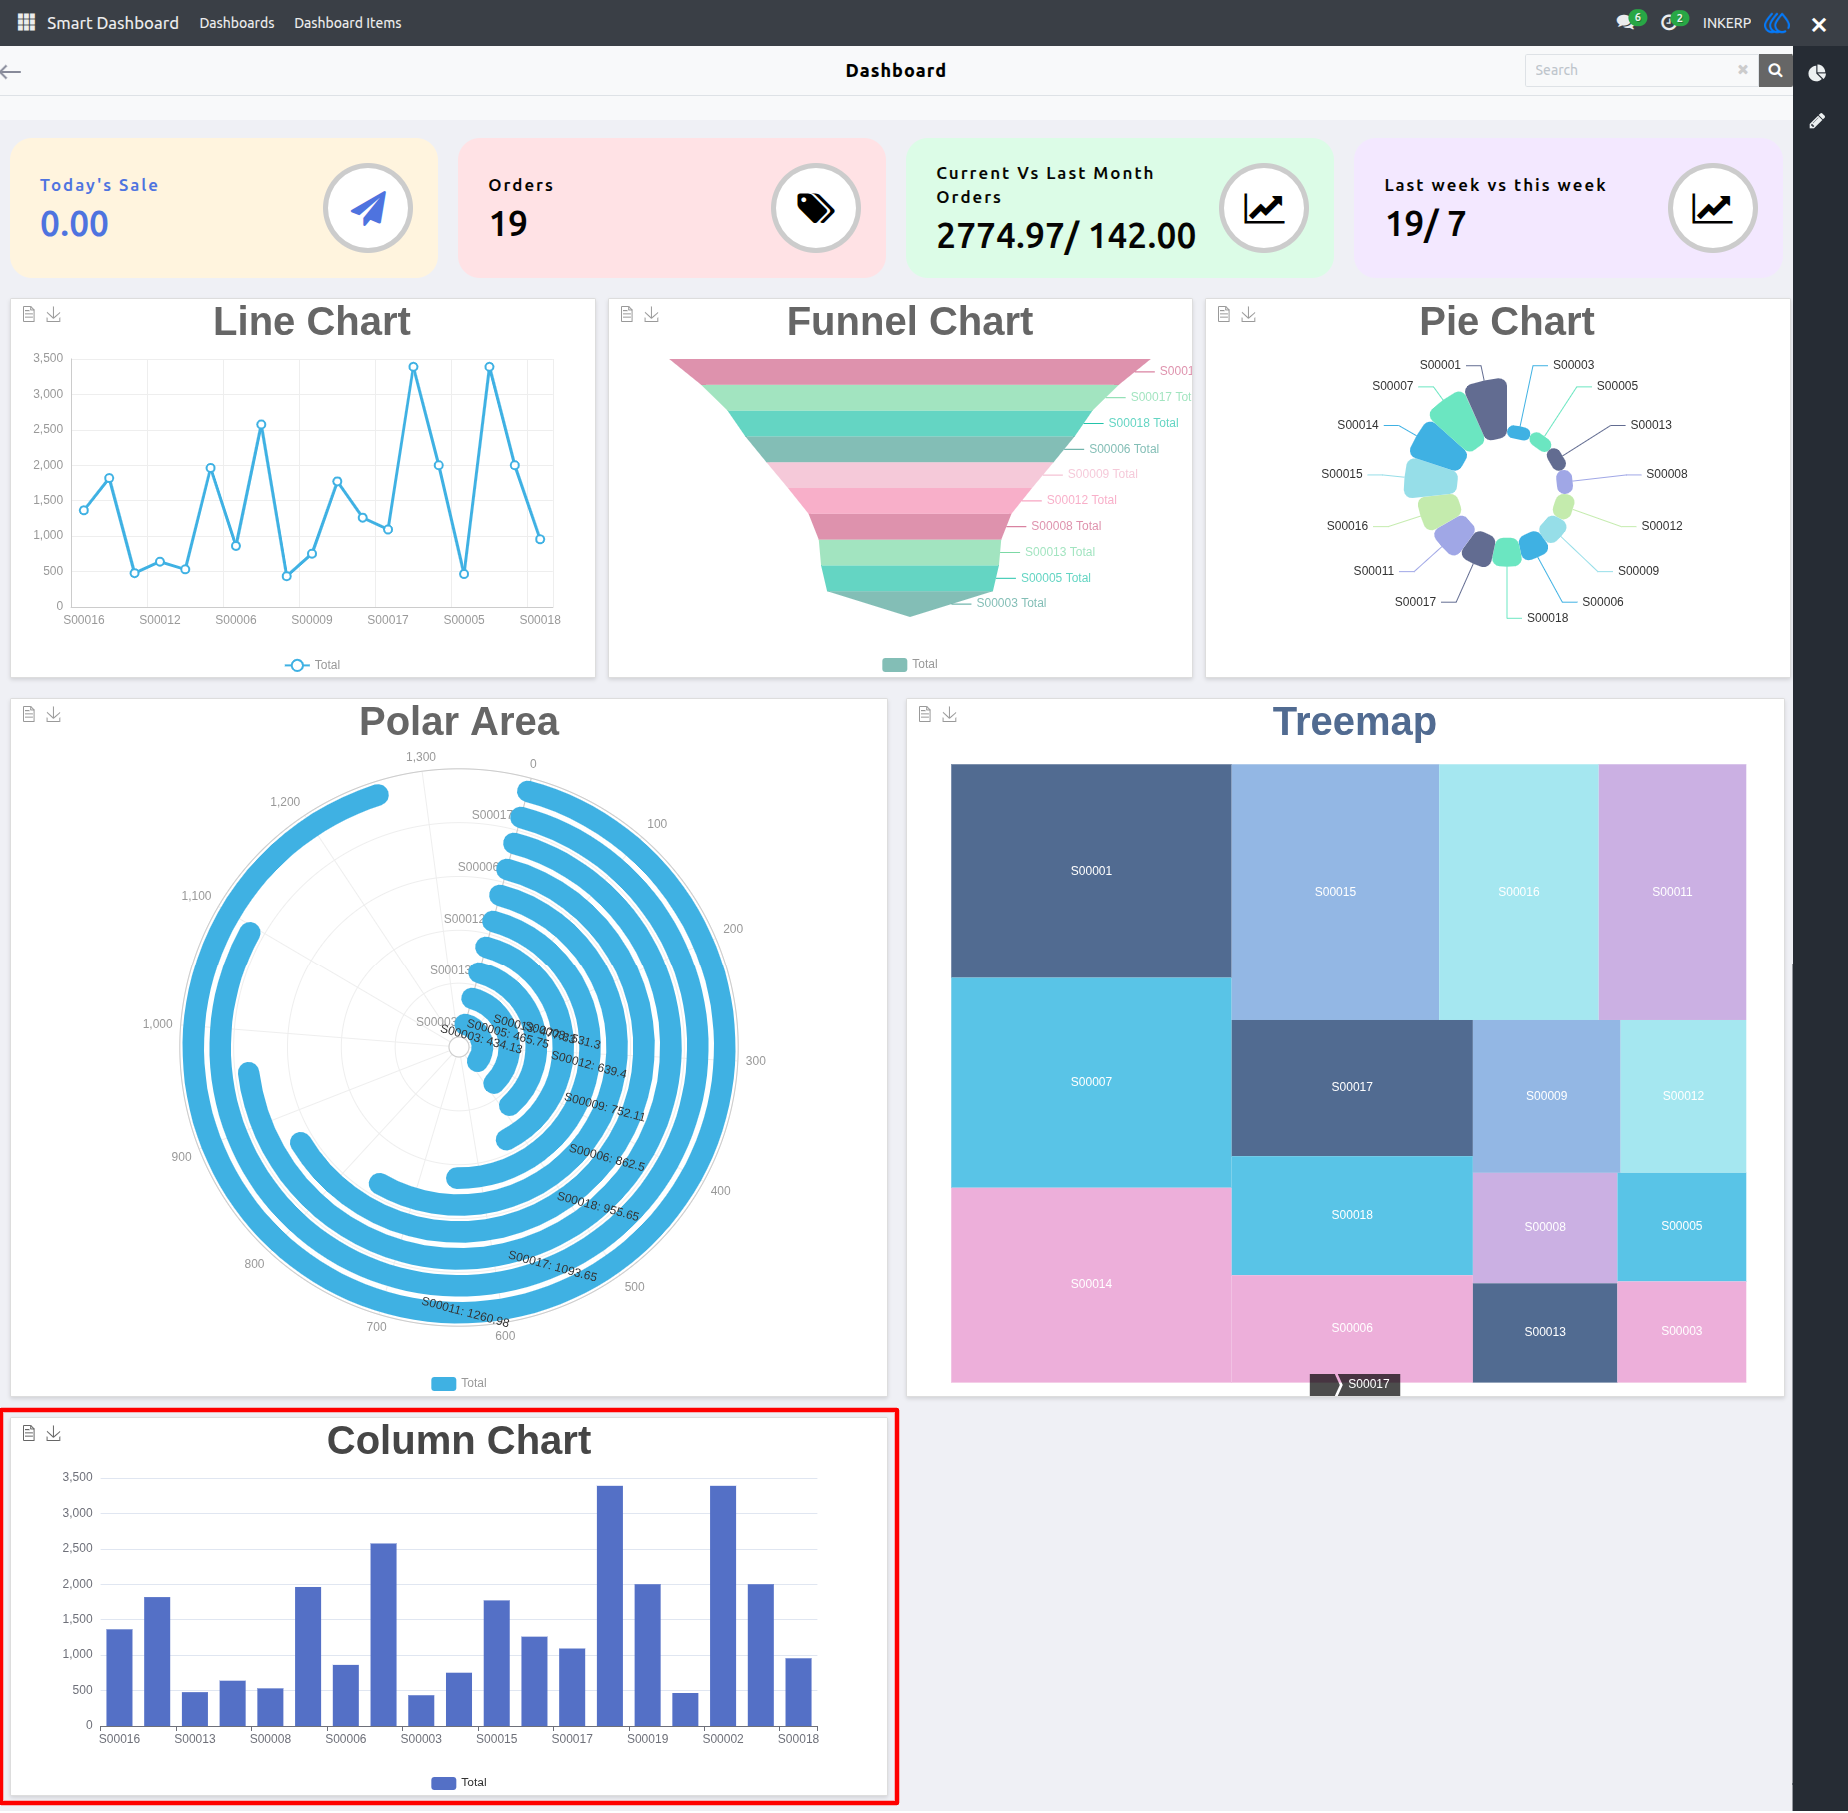
19. Newly Added Chart View
The newly added chart is now visible in the dashboard template view.
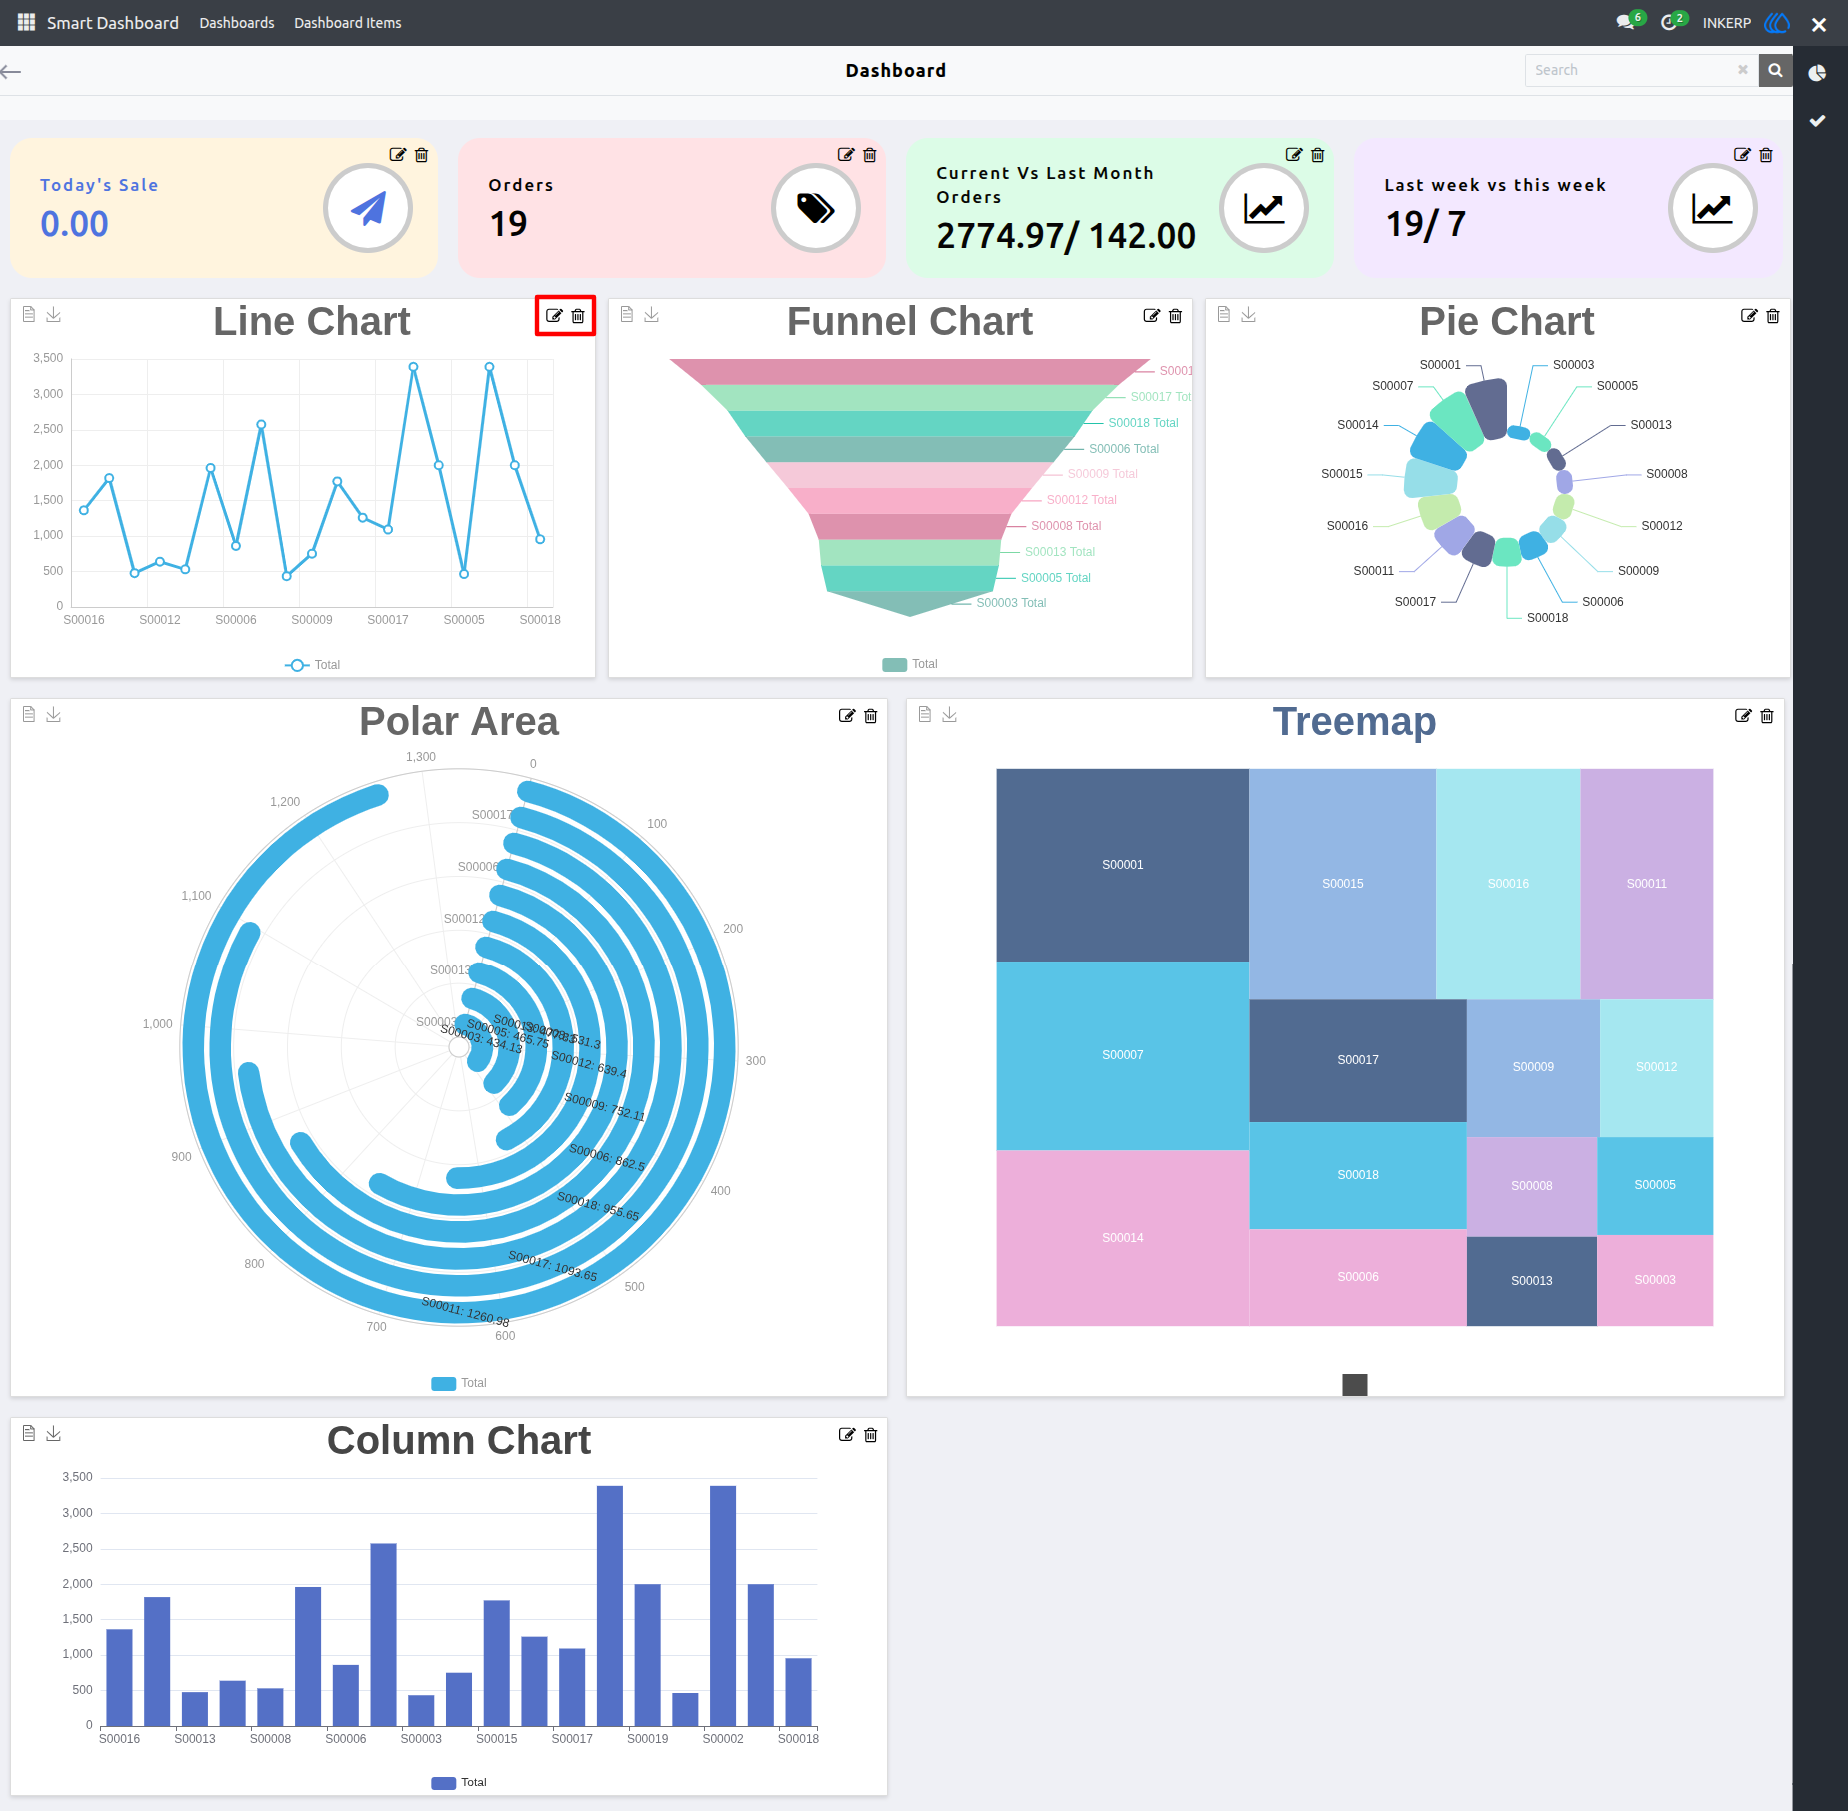
20. Pixel Sidebar View
Users can see the 'Edit Chart' option, which allows them to modify, delete, move, or resize existing charts within the dashboard.
21. Editable Dashboard View
After clicking 'Edit Chart', the user will see options to edit, delete, resize, and reposition charts making it easy to customize the dashboard layout.
22. Dashboard Property Popup View
Clicking the 'Edit' button of particular chart it opens a popup where users can customize the chart adjusting settings and content to meet their specific needs.
User Guide